By: Team T12-3 Since: Aug 2018 Licence: MIT
- 1. Introduction
- 2. Setting up
- 3. Design
- 4. Implementation
- 4.1. Add Recurring Tasks
- 4.2. Undo/Redo Commands
- 4.3. Log Messages
- 4.4. Configuration
- 4.5. View Tasks Due Today/This Week
- 4.6. Archive Task
- 4.7. Automatic Partial Deletion of Archived Tasks
- 4.8. List Tasks by Month
- 4.9. Generate Academic Calendar Weeks
- 4.10. Filter by Tags (
filterandfilterstrict) - 4.11. List Overdue Tasks
- 4.12. List Archived Tasks
- 4.13. Sort tasks
- 4.14. Managing Tags Using Category
- 4.15. Display Tags in Sidebar
- 4.16. Display Progress Bars
- 5. Documentation
- 6. Testing
- 7. Dev Ops
- Appendix A: Product Scope
- Appendix B: User Stories
- Appendix C: Use Cases
- Appendix D: Non Functional Requirements
- Appendix E: Glossary
- Appendix F: Instructions for Manual Testing
1. Introduction
This Developer Guide for the Student Schedule Planner is written by the SSP team for the benefits of future developers and maintainers of the application.
Student Schedule Planner is a desktop application aims to help students save their tasks manage them all in one place .
This introduction briefly covers the main flow of the Developer Guide:
1. Setting up : Walkthrough on the prequisites steps to setup the Developer Environment
2. Design : Overview on the structure of the project code, and how each component interacts with each other.
3. Implementation : In-depth explanation on the implementation of the various features in the Schedule Planner, as well as the considerations behind the implementations
4. Documentation : General guide on the documentation process of the project
5. Testing : Documentation for the coverage tests of the application and how to set up your testing environment.
6. DevOps : General processes used during development phase, and documentation on how to set it up.
2. Setting up
Before you start working on the project, please make sure that you have completed the necessary prerequisites.
2.1. Prerequisites
-
JDK
9or laterJDK 10on Windows will fail to run tests in headless mode due to a https://github .com/javafxports/openjdk-jfx/issues/66[JavaFX bug]. Windows developers are highly recommended to use JDK9. -
IntelliJ IDE
IntelliJ by default has Gradle and JavaFx plugins installed.
Do not disable them. If you have disabled them, go toFile>Settings>Pluginsto re-enable them.
2.2. Setting up the project in your computer
-
Fork this repo, and clone the fork to your computer
-
Open IntelliJ (if you are not in the welcome screen, click
File>Close Projectto close the existing project dialog first) -
Set up the correct JDK version for Gradle
-
Click
Configure>Project Defaults>Project Structure -
Click
New…and find the directory of the JDK
-
-
Click
Import Project -
Locate the
build.gradlefile and select it. ClickOK -
Click
Open as Project -
Click
OKto accept the default settings -
Open a console and run the command
gradlew processResources(Mac/Linux:./gradlew processResources). It should finish with theBUILD SUCCESSFULmessage.
This will generate all resources required by the application and tests. -
Open
XmlAdaptedTask.javaandMainWindow.javaand check for any code errors-
Due to an ongoing issue with some of the newer versions of IntelliJ, code errors may be detected even if the project can be built and run successfully
-
To resolve this, place your cursor over any of the code section highlighted in red. Press ALT+ENTER, and select
Add '--add-modules=…' to module compiler optionsfor each error
-
-
Repeat this for the test folder as well (e.g. check
XmlUtilTest.javaandHelpWindowTest.javafor code errors, and if so, resolve it the same way)
2.3. Verifying the setup
-
Run
MainAppand try a few commands -
Run the tests to ensure they all pass.
2.4. Configurations to do before writing code
2.4.1. Configuring the coding style
This project follows oss-generic coding standards. IntelliJ’s default style is mostly compliant with ours but it uses a different import order from ours. To rectify,
-
Go to
File>Settings…(Windows/Linux), orIntelliJ IDEA>Preferences…(macOS) -
Select
Editor>Code Style>Java -
Click on the
Importstab to set the order:-
For
Class count to use import with '*'andNames count to use static import with '*': Set to999to prevent IntelliJ from contracting the import statements -
For
Import Layout: The order isimport static all other imports,import java.*,import javax.*,import org.*,import com.*,import all other imports. Add a<blank line>between eachimport
-
Optionally, you can follow the UsingCheckstyle.adoc document to configure Intellij to check style-compliance as you write code.
2.4.2. Updating documentation to match your fork
After forking the repo, the documentation will still have the SE-EDU branding and refer to the ssp/scheduleplanner
repo.
If you plan to develop this fork as a separate product (i.e. instead of contributing to ssp/scheduleplanner), you should do the following:
-
Configure the site-wide documentation settings in
build.gradle, such as thesite-name, to suit your own project. -
Replace the URL in the attribute
repoURLinDeveloperGuide.adocandUserGuide.adocwith the URL of your fork.
2.4.3. Setting up CI
Set up Travis to perform Continuous Integration (CI) for your fork. See UsingTravis.adoc to learn how to set it up.
After setting up Travis, you can optionally set up coverage reporting for your team fork (see UsingCoveralls.adoc).
| Coverage reporting could be useful for a team repository that hosts the final version but it is not that useful for your personal fork. |
Optionally, you can set up AppVeyor as a second CI (see UsingAppVeyor.adoc).
| Having both Travis and AppVeyor ensures your App works on both Unix-based platforms and Windows-based platforms (Travis is Unix-based and AppVeyor is Windows-based) |
2.4.4. Getting started with coding
When you are ready to start coding,
-
Get some sense of the overall design by reading Section 3.1, “Architecture”.
-
Take a look at Appendix A, Product Scope.
3. Design
This section covers the structural design of the App, as well as how its various components interact with each other.
3.1. Architecture
The Architecture Diagram given below explains the structural design of the App. It is followed by is a quick overview of each component.
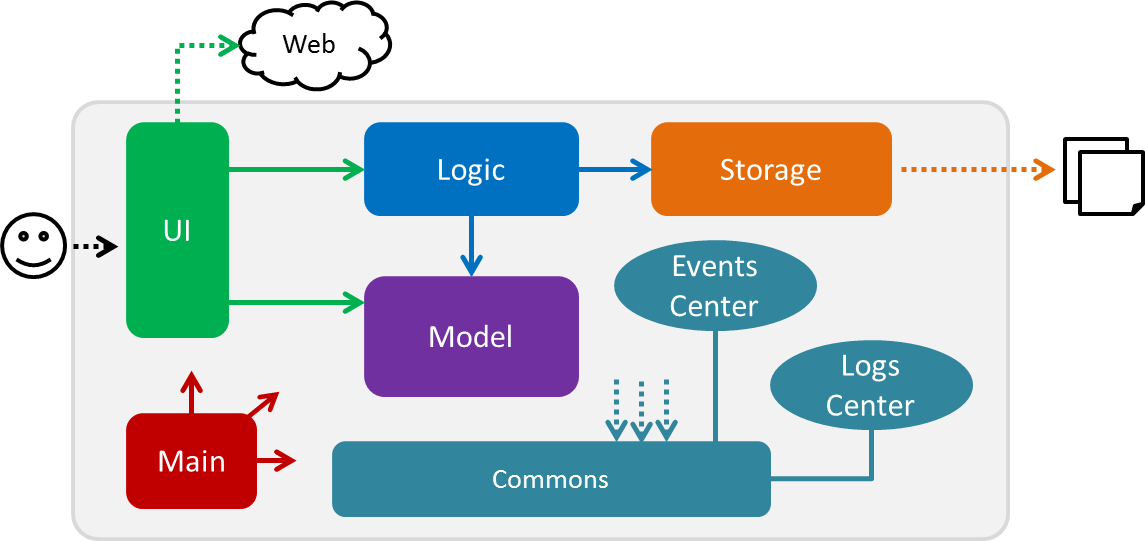
The .pptx files used to create diagrams in this document can be found in the diagrams folder. To update a diagram, modify the diagram in the pptx file, select the objects of the diagram, and choose Save as picture.
|
Main has only one class called MainApp. It is responsible for:
-
At app launch: Initializing the components in the correct sequence, and connecting them up with each other.
-
At shut down: Shutting down the components and invoking cleanup method where necessary.
Commons represents a collection of classes used by multiple other components. Two of those classes play important roles at the architecture level. They are:
-
EventsCenter: This class (written using Google’s Event Bus library) is used by components to communicate with other components using events (i.e. a form of Event Driven design) -
LogsCenter: This class is used by many classes to write log messages to the App’s log file.
The rest of the App consists of four components:
Each of the four components:
-
Defines its API in an
interfacewith the same name as the Component. -
Exposes its functionality using a ` (Component Name)Manager` class.
For example, Logic(see the class diagram given below) defines its API in Logic.java interface
and exposes its functionality using LogicManager.java class.
Events-Driven nature of the design
The Sequence Diagram below shows how the components interact for the scenario where the user issues the command
delete 1.

delete 1 command (part 1)
Model simply raises a SchedulePlannerChangedEvent when the schedule planner data is changed, instead of
asking Storage to save updates to the hard disk.
|
The diagram below shows how EventsCenter reacts to the event, after which the updates are saved
to the hard disk, and the status bar of the UI is updated to reflect 'Last Updated' time.
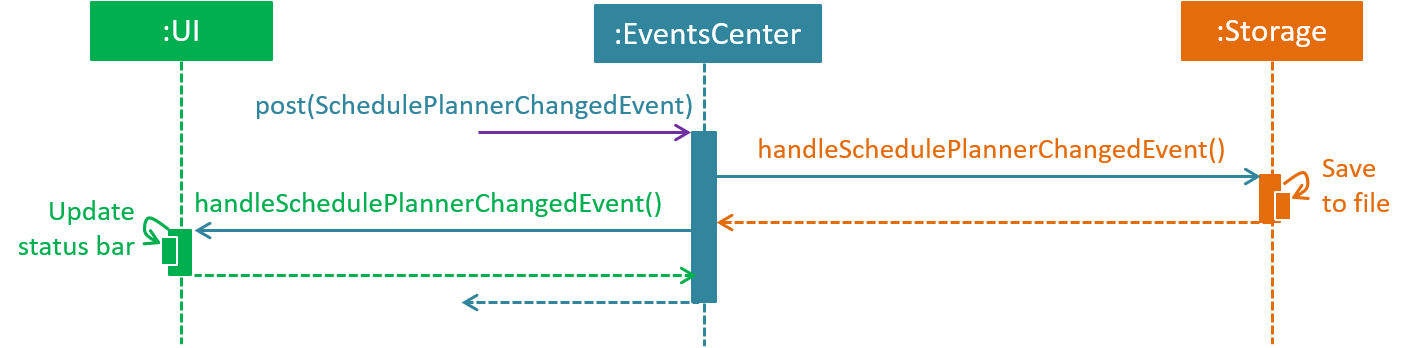
delete 1 command (part 2)
The event is propagated through EventsCenter to Storage and UI, without Model having to be coupled to either of
them. This is an example of how Event Driven approach helps us reduce direct coupling between components.
|
The sections below give more details of each component.
3.2. UI component
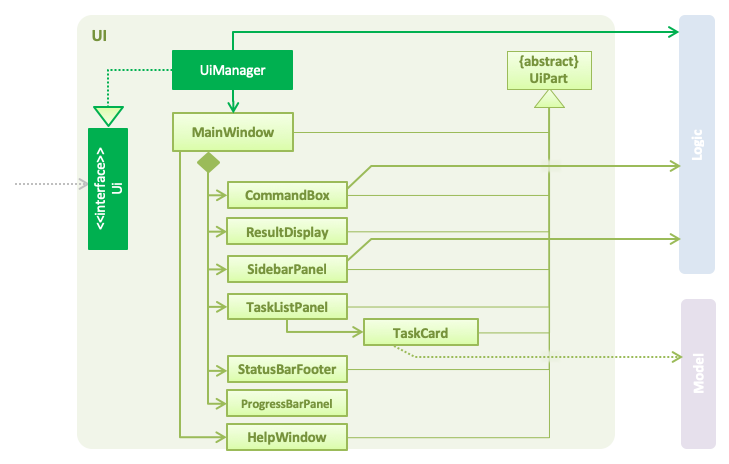
API : Ui.java
The UI consists of MainWindow, which is made up of CommandBox, ResultDisplay, TaskListPanel,
StatusBarFooter, SidebarPanel etc.
All these, including MainWindow, inherit from the abstract UiPart class.
UI uses JavaFx UI framework. The layout of these UI parts are defined in matching .fxml files that are in the src/main/resources/view folder. For example, the layout of the MainWindow is specified in MainWindow.fxml
UI component does the following:
-
Executes user commands using
Logiccomponent. -
Binds itself to some data in
Modelso that the UI can auto-update when data inModelchanges. -
Responds to events raised from various parts of the App and updates the UI accordingly.
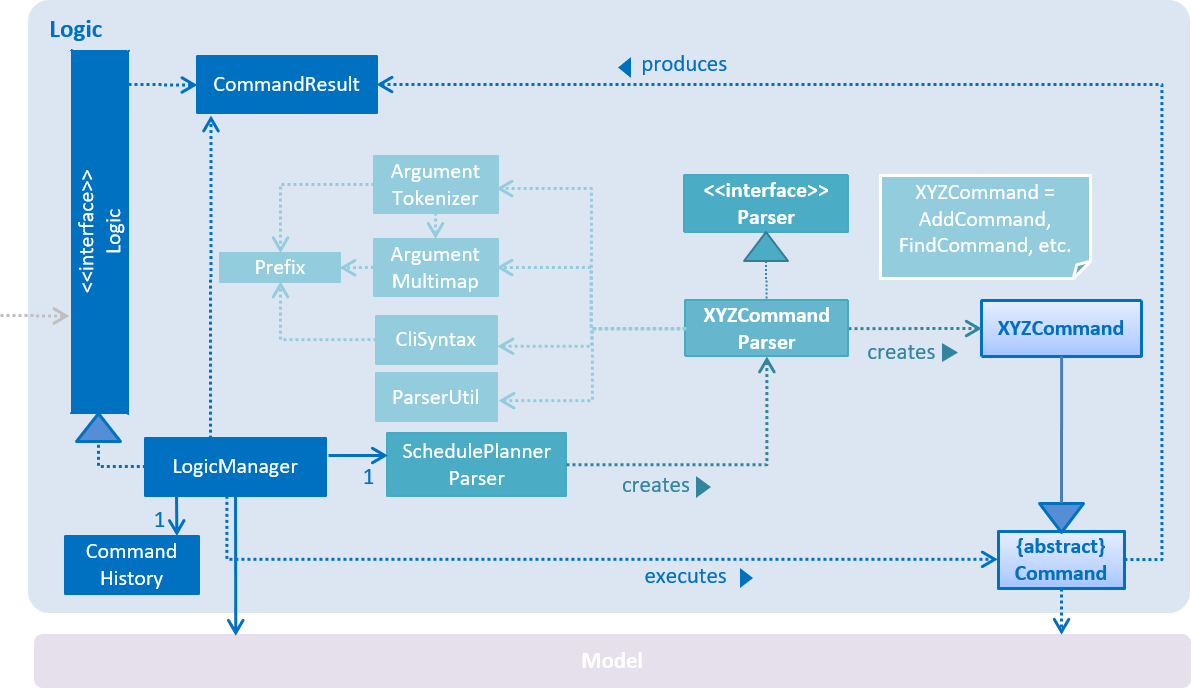
3.3. Logic component
API :
Logic.java
Below are the steps of how Logic executes an user command:
-
LogicusesSchedulePlannerParserto parse the user command. -
This creates a
Commandobject which is executed byLogicManager. -
The command execution can affect
Model(e.g. adding a task) and/or raise events. -
The result is encapsulated as a
CommandResultobject which is passed back toUi.
Given below is the Sequence Diagram for interactions within Logic for the execute("delete 1") API call.
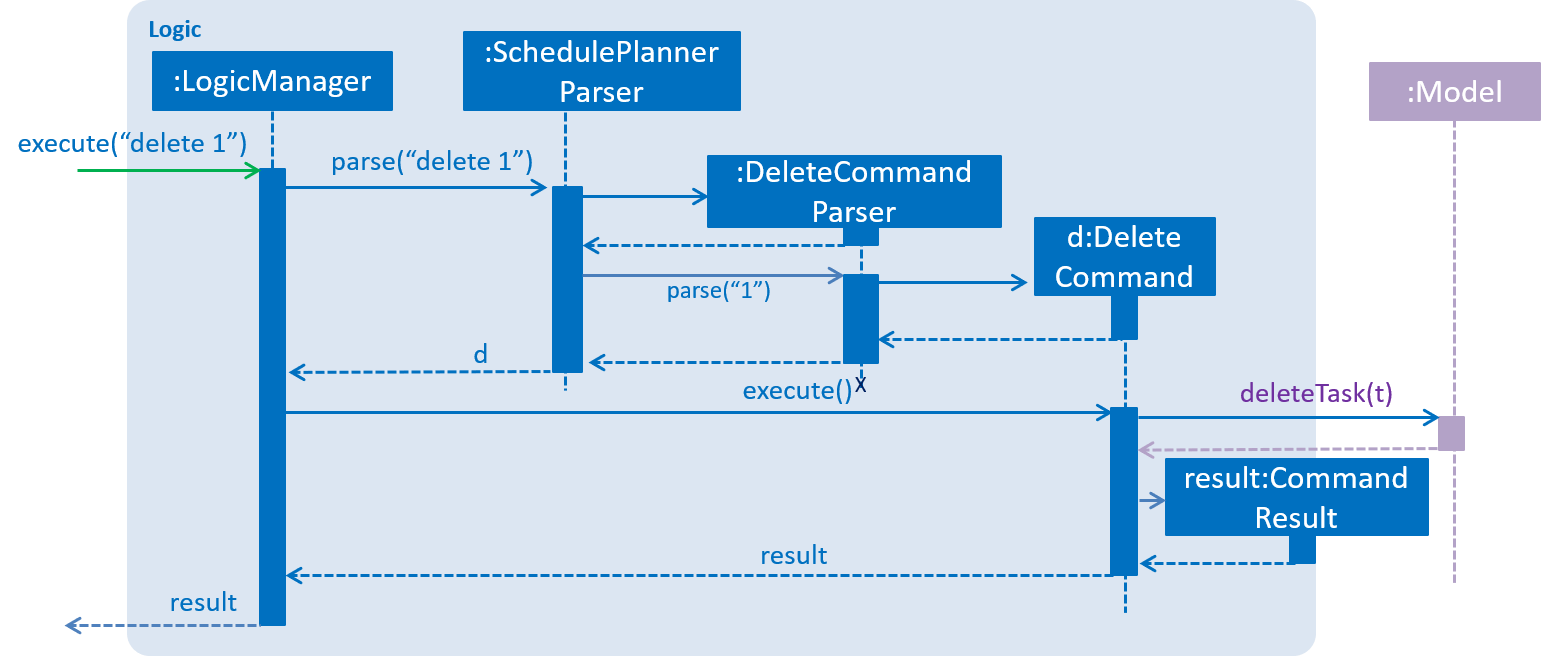
delete 1 Command within Logic Component3.4. Model component
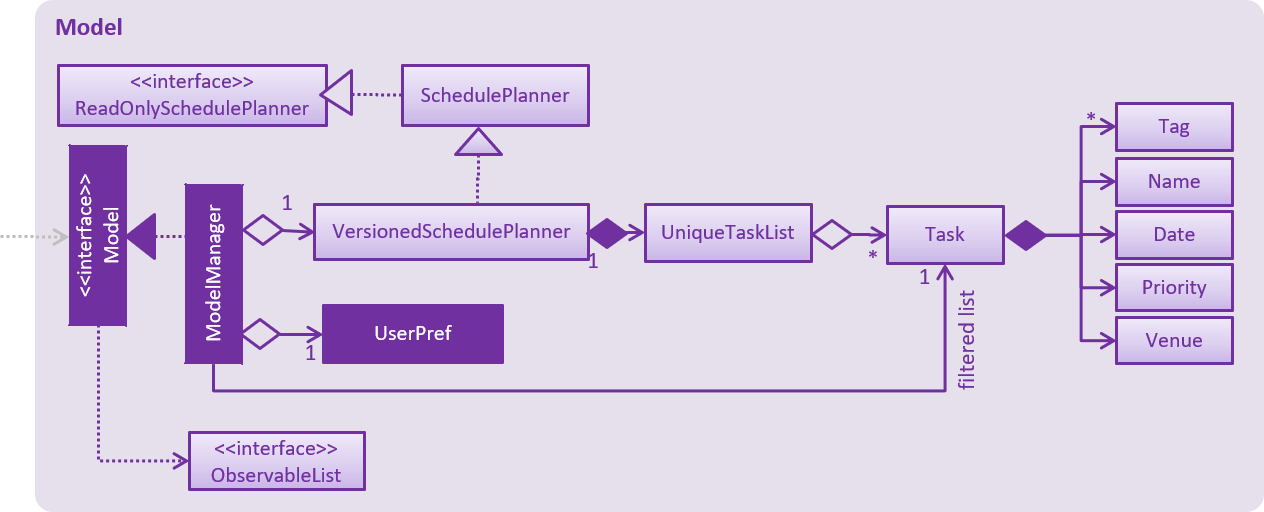
API : Model.java
The Model component does the following:
-
Stores a
UserPrefobject that represents the user’s preferences. -
Stores the Schedule Planner data.
-
Exposes an unmodifiable, observable
ObservableList<Task>e.g. UI can be bound to this list, such that it automatically updates when data in the list changes. -
Does not depend on any of the other three components.
As a more OOP model, we can store a Tag list in Schedule Planner, which Task can reference. This would allow Schedule Planner to only require one Tag object per unique Tag, instead of each Task needing their own Tag object. An example of how such a model may look like is given below.
|
3.5. Storage component
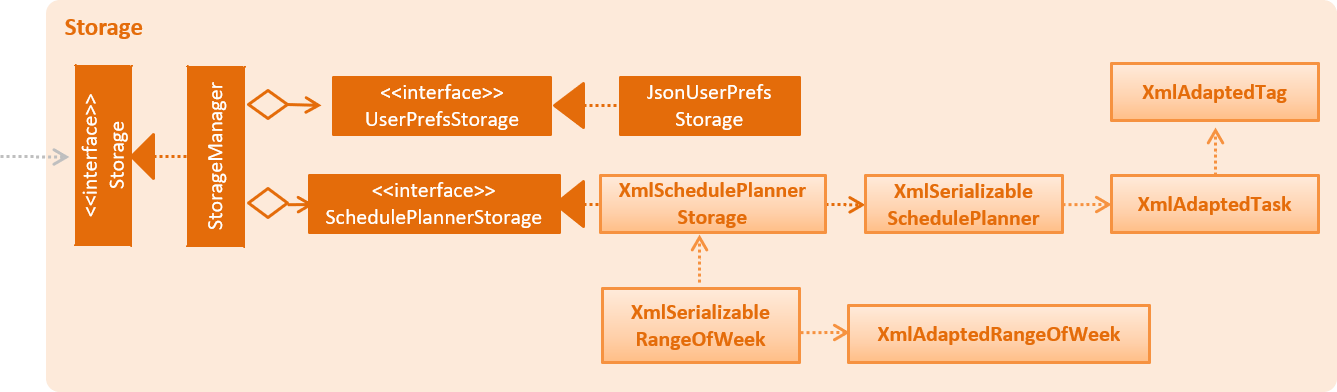
API : Storage.java
The Storage component does the following:
-
Saves
UserPrefobjects in json format and reads it back. -
Saves the Schedule Planner data in xml format and reads it back.
3.6. Common classes
Classes used by multiple components are in the ssp.scheduleplanner.commons package.
4. Implementation
This section elaborates on how certain features are implemented.
4.1. Add Recurring Tasks
The Add Repeat feature allows the user to add recurring tasks of a specified number of repeats and a specified interval between each repeat.
4.1.1. Current Implementation
The following code snippet shows how the command is implemented:
...
// Loop through to add the rest of the tasks.
for (int i = 1; i < Integer.parseInt(repeat.value); i++) {
    baseDate.add(Calendar.DAY_OF_YEAR, interval);
    newDate = schedulerFormat.format(baseDate.getTime());
    date = new Date(newDate);
    newTask = new Task(toAdd.getName(), date,
            toAdd.getPriority(), toAdd.getVenue(), toAdd.getTags());
    // Add the task only if there is no duplicate task within the model.
    if (!model.hasTask(newTask)) {
            model.addTask(newTask);
    }
}
...
This loop occurs after the first task is added. The tasks are created within the loop with duplicate names, priorities, venues and tags. Before adding a task, the function checks with the model if such a task already exists. If not, the task is added. If the task is a duplicate task, it is skipped and the loop proceeds until it terminates.
The following outlines an example of the command’s usage.
Step 1. The user enters the command repeat n/CS2103T Tutorial i/7 r/3 p/3 t/CS2103T t/Tutorial v/COM1
Step 2. The AddRepeatParser parses the command and isolates each of the arguments.
Step 3. The Model checks if the first task exists. If the first task does not exist in Model, it is added. If not, it is skipped.
Step 4. The execute command loops through to build each repeated task. In each loop, the date is incremented by the specified interval. Same as Step 3, a duplicate task is skipped and a task that does not exist in Model is added.
Step 5. The changes are committed and the new list is shown to the user.
The following sequence diagram shows how the add repeat operation works:

4.2. Undo/Redo Commands
The Undo/Redo feature allows the user to revert the schedule planner to an earlier state when 'undo' is called, or a later state when 'redo' is called.
4.2.1. Current Implementation
The undo/redo mechanism is facilitated by VersionedSchedulePlanner.
It extends SchedulePlanner with an undo/redo history, stored internally as an SchedulePlannerStateList and currentStatePointer.
Additionally, it implements the following operations:
-
VersionedSchedulePlanner.commit()— Saves the current schedule planner state in 'history'. -
VersionedSchedulePlanner.undo()— Restores the previous schedule planner state from 'history'. -
VersionedSchedulePlanner.redo()— Restores a previously undone schedule planner state from 'history'.
These operations are exposed in Model interface as Model#commitSchedulePlanner(), Model#undoSchedulePlanner() and Model#redoSchedulePlanner() respectively.
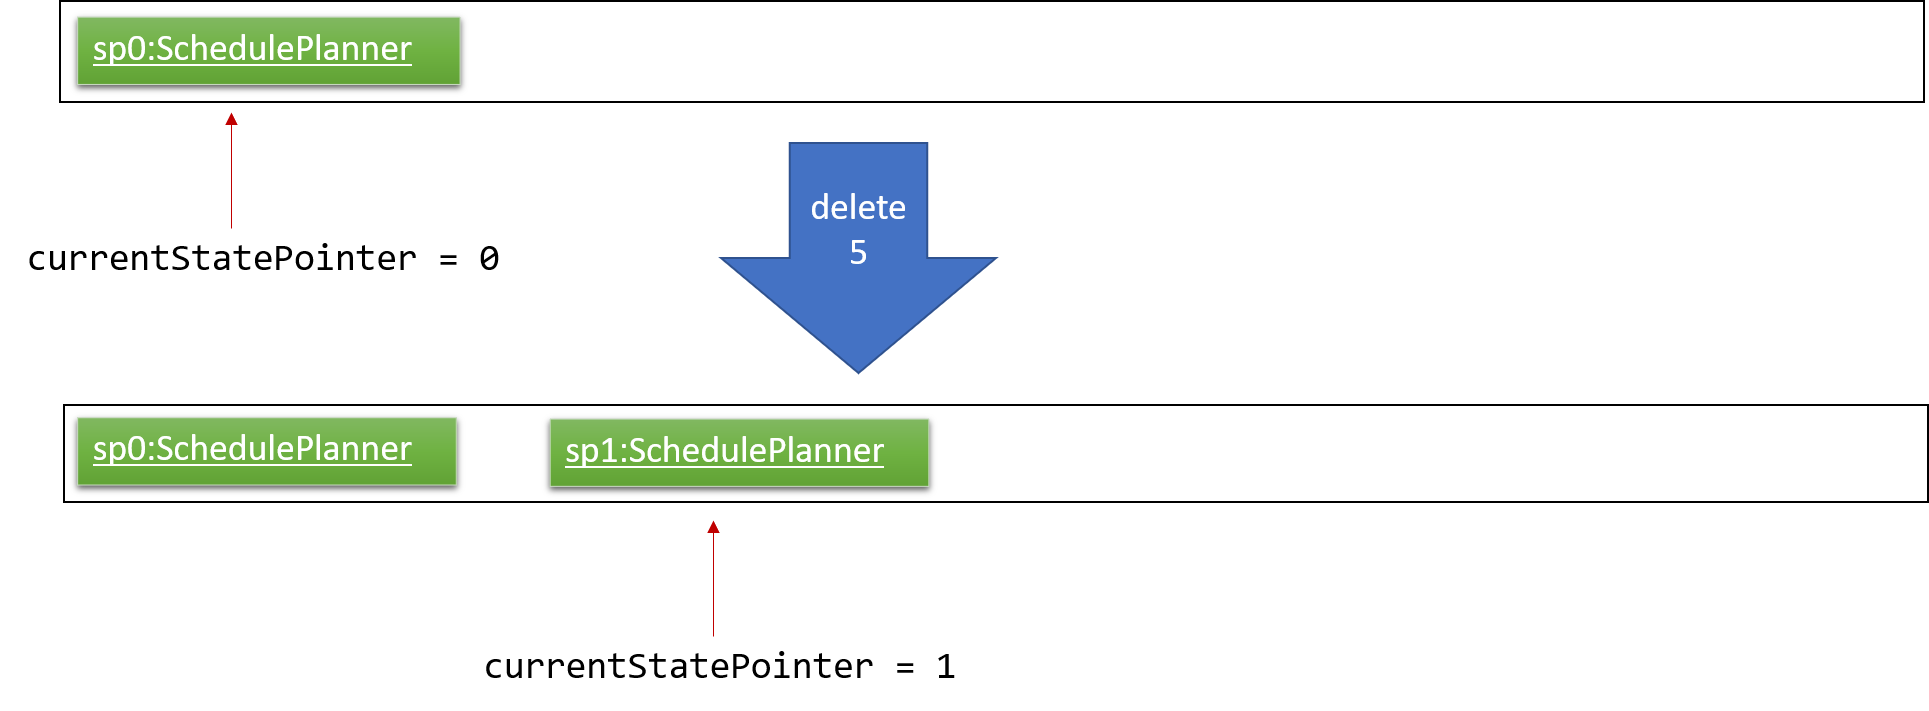
Given below is an example usage scenario and how the undo/redo mechanism behaves at each step:
Step 1. The user launches the application for the first time. VersionedSchedulePlanner will be initialized with the
initial schedule planner state, with currentStatePointer pointing to that single schedule planner state.

Step 2. The user executes delete 5 command. The delete command calls Model#commitSchedulePlanner(), as a result
the modified state of the schedule planner is saved in schedulePlannerStateList after the delete 5 command
executes, the currentStatePointer shifts to the newly inserted schedule planner state.
Step 3. The user executes add n/CS2100 Lect … to add a new task. The add command calls
Model#commitSchedulePlanner()
`, and the modified schedule planner state is saved into `schedulePlannerStateList
.

If a command execution fails, it will not call Model#commitSchedulePlanner(), so the schedule planner state will not
be saved into schedulePlannerStateList.
|
Step 4. The user now decides to undo that action by executing the undo command. The undo command will call
Model#undoSchedulePlanner(), which shifts the currentStatePointer to the previous index, pointing to the
previous schedule planner state, and restoring the schedule planner to its previous state.
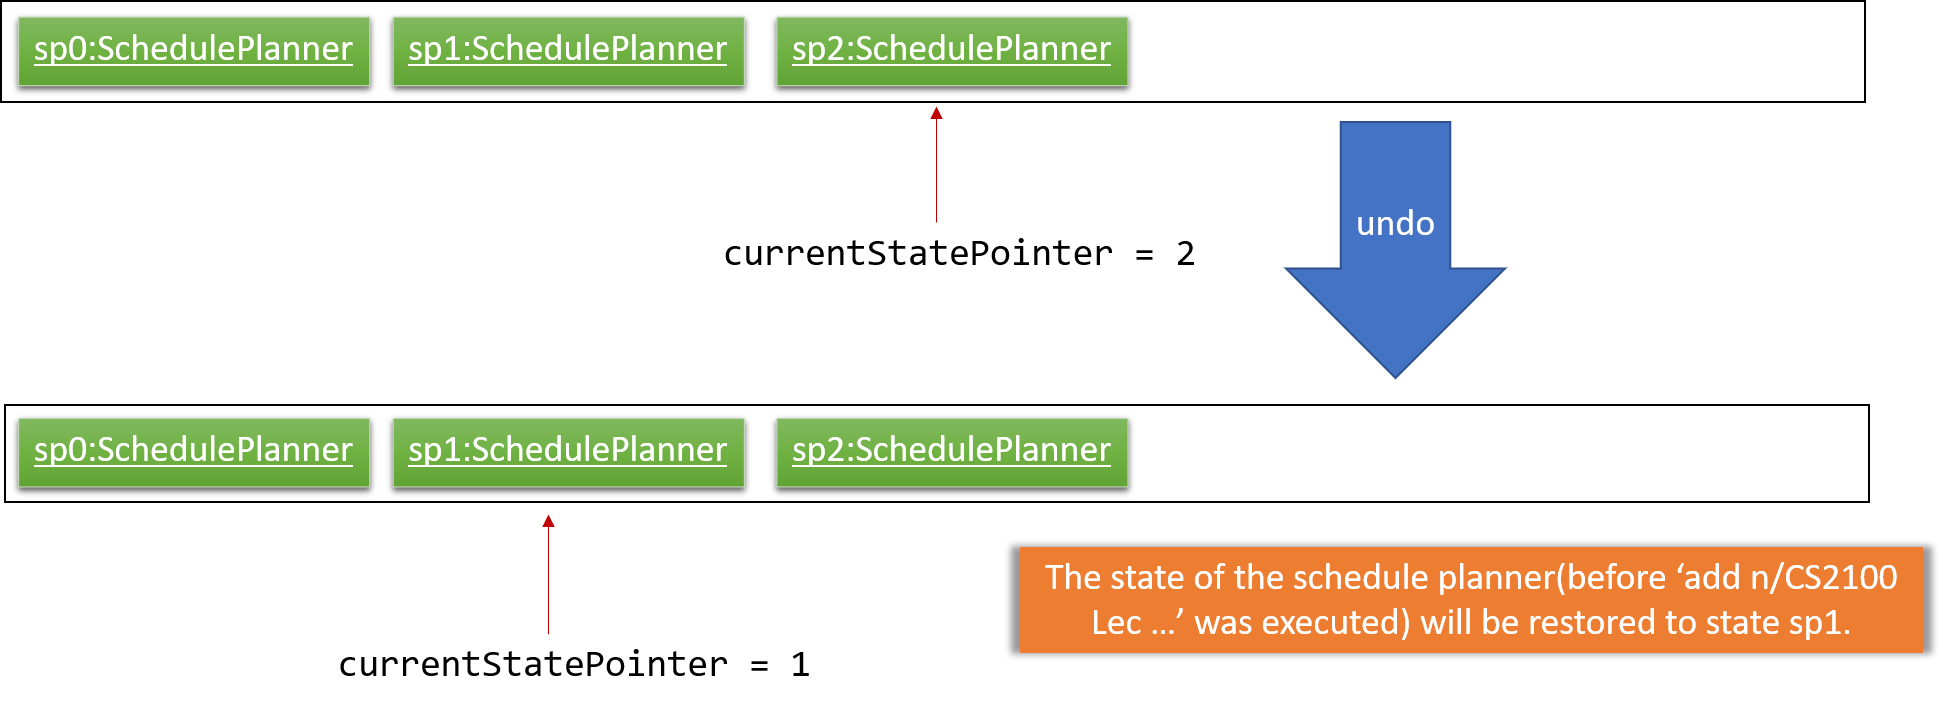
If the currentStatePointer is at index 0(i.e the initial schedule planner state), then there are no previous states to restore to. The undo command uses Model#canUndoSchedulePlanner() to check this case.
If so, it will return an error to the user rather than attempting to perform the undo.
|
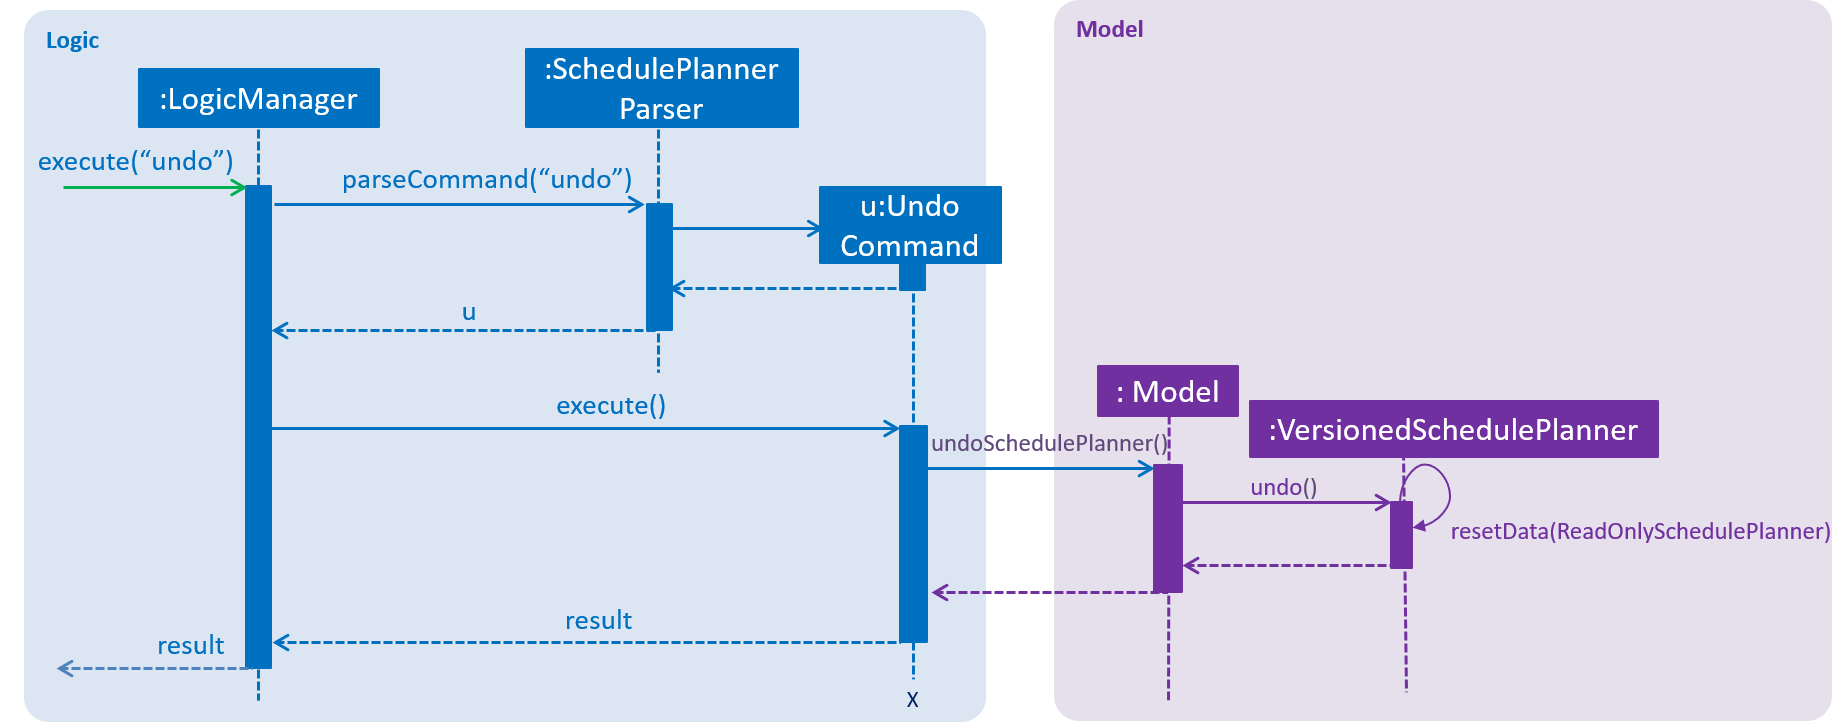
The following sequence diagram shows how the undo operation works:
The redo command does the opposite — it calls Model#redoSchedulePlanner(), which shifts the
currentStatePointer to the next index, pointing to the next state, and restores the schedule planner to
that state.
If currentStatePointer is at index schedulePlannerStateList.size() - 1 (i.e pointing to the latest state), then there are no latest states to restore. The redo command uses Model#canRedoSchedulePlanner() to check this case. If so, it will return an error to the user rather than attempting to perform the redo.
|
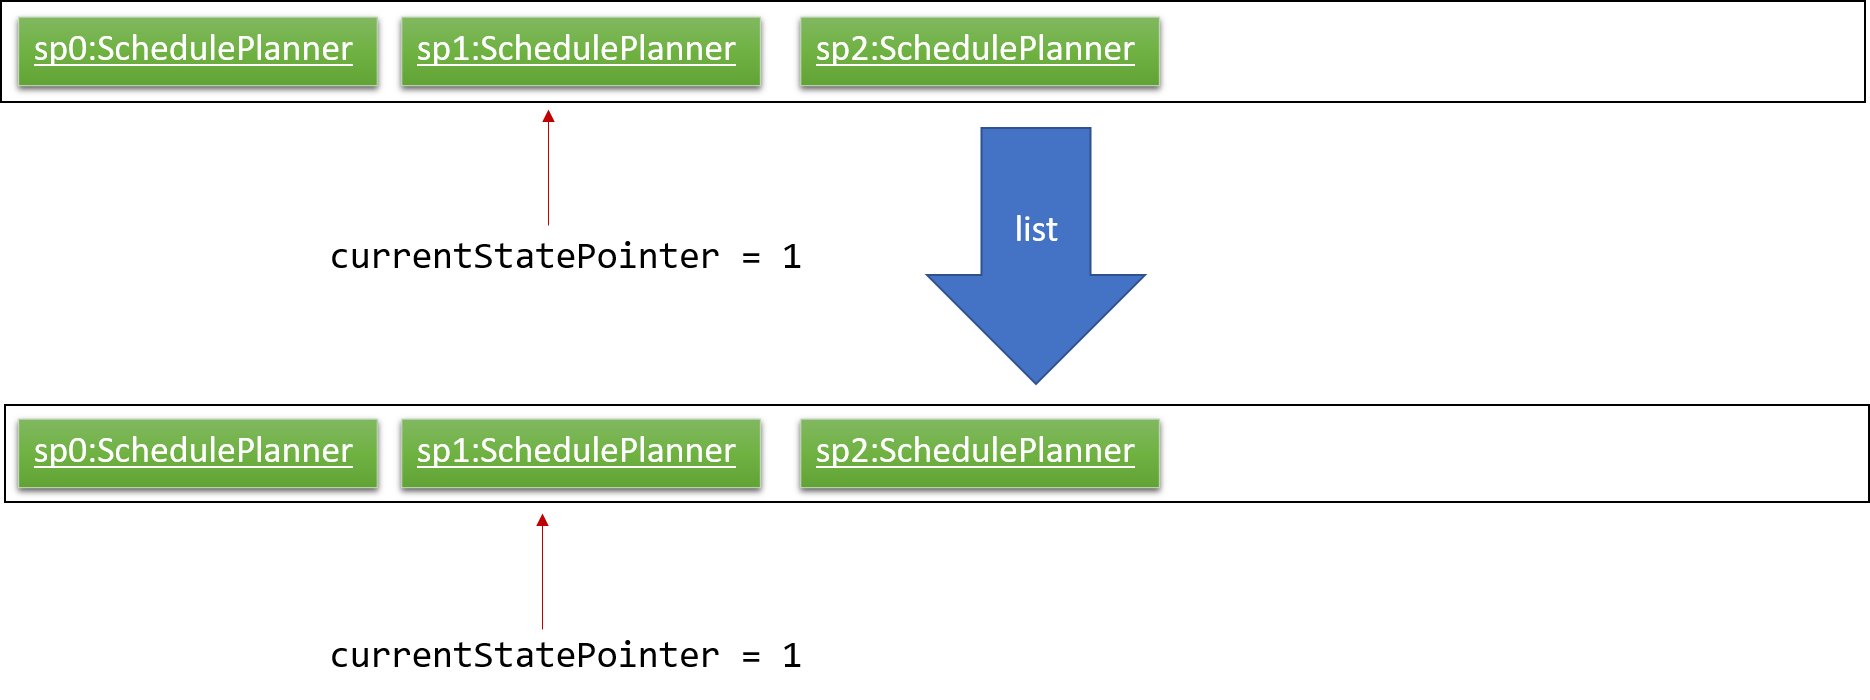
Step 5. The user then executes the command list. Commands that do not modify the schedule planner, such as list,
will usually not call Model#commitSchedulePlanner(), Model#undoSchedulePlanner() or Model#redoSchedulePlanner(). Thus, the schedulePlannerStateList remains unchanged.
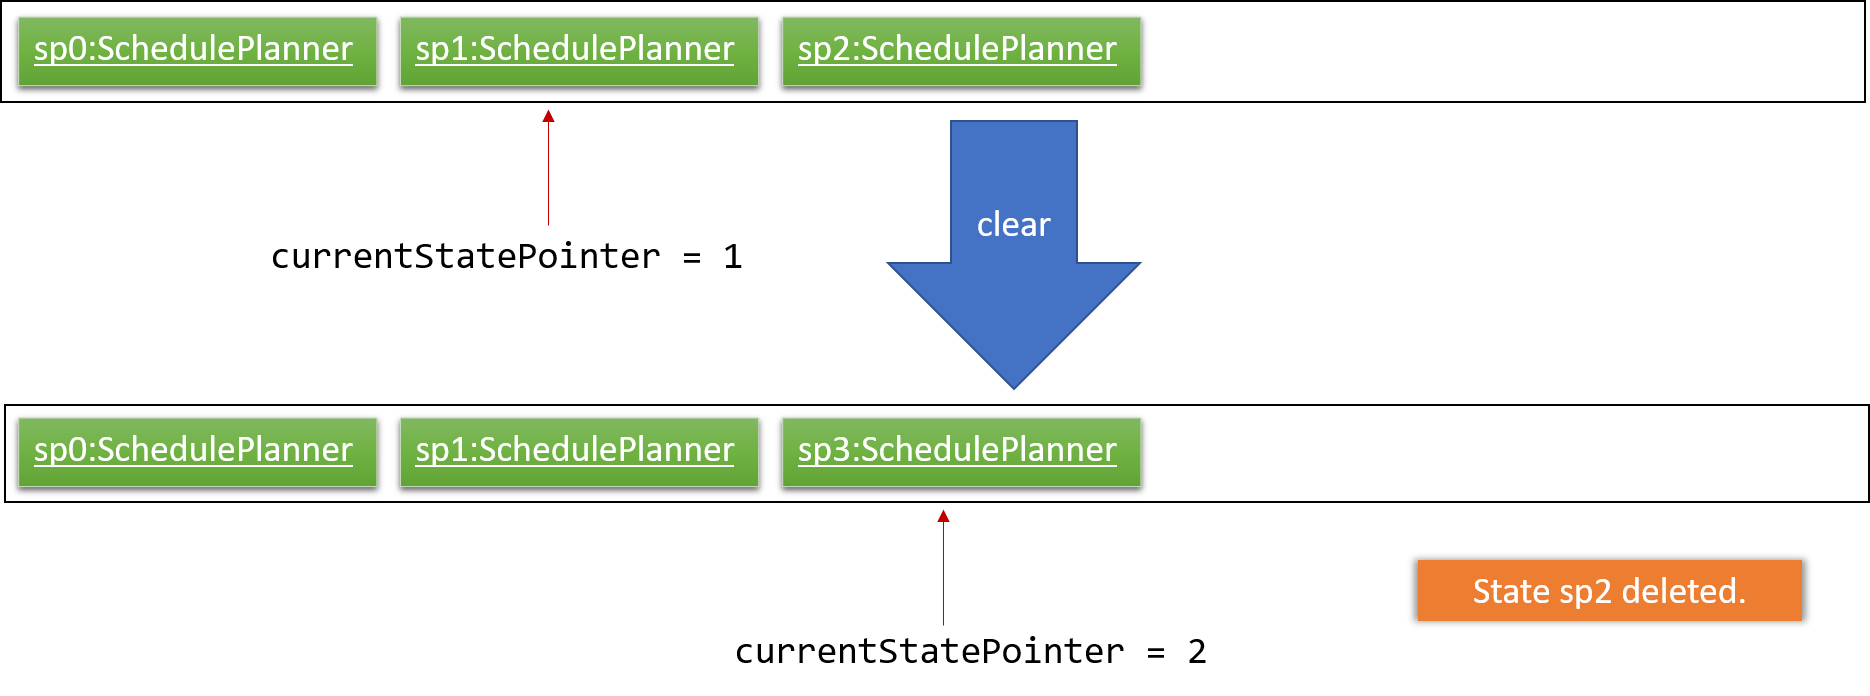
Step 6. The user executes clear, which calls Model#commitSchedulePlanner(). If the currentStatePointer is not
pointing to the latest state in the schedulePlannerStateList, all states after the
currentStatePointer will be purged. We designed it this way because it no longer makes sense to redo the add n/David … command. This is the behavior that most modern desktop applications follow.
The following activity diagram summarizes what happens when a user executes a new command:

4.2.2. Design Considerations
Aspect: How undo & redo executes
-
Alternative 1 (current choice): The entire schedule planner is saved.
-
Pros: It is easy to implement.
-
Cons: It may have performance issues in terms of memory usage.
-
-
Alternative 2: Each individual command knows how to undo/redo by itself.
-
Pros: It will use less memory (e.g. for
delete, just save the task being deleted). -
Cons: We must ensure that the implementation of each individual command is correct.
-
Aspect: Data structure to support the undo/redo commands
-
Alternative 1 (current choice): A list is used to store the history of schedule planner states.
-
Pros: It is easy for new Computer Science student undergraduates to understand, who are likely to be the new incoming developers of our project.
-
Cons: Logic is duplicated twice. For example, when a new command is executed, we must remember to update both
HistoryManagerandVersionedSchedulePlanner.
-
-
Alternative 2:
HistoryManageris used for undo/redo.-
Pros: We do not need to maintain a separate list, and just reuse what is already in the codebase.
-
Cons: It requires dealing with commands that have already been undone: We must remember to skip these commands. It violates Single Responsibility Principle and Separation of Concerns as
HistoryManagernow needs to do two different things.
-
4.3. Log Messages
We are using java.util.logging package for logging. LogsCenter class is used to manage logging levels and
destinations.
How to log:
-
The logging level can be controlled using
logLevelsetting in the configuration file (See Section 4.4, “Configuration”) -
The
Loggerfor a class can be obtained usingLogsCenter.getLogger(Class)which will log messages according to the specified logging level -
The log messages are output through:
Consoleand to a.logfile.
Logging Levels
The following are logging levels used:
-
SEVERE: This is for critical problems detected which may possibly cause the termination of the application -
WARNING: This is to warn that application can continue running, but with caution -
INFO: This is for information showing the noteworthy actions by the App -
FINE: This is for details that are not usually noteworthy but may be useful in debugging e.g. print the actual list instead of just its size
4.4. Configuration
Certain properties of the application can be controlled (e.g App name, logging level) through the configuration file (default: config.json).
4.5. View Tasks Due Today/This Week
In order to enable users to better monitor their tasks in the schedule planner, Two variations of
list command were added.
listday command supports viewing tasks due on the current date, whereas listweek command supports viewing tasks
from the current date till the closest Sunday.
4.5.1. Current Implementation
listday/listweek utilises the same implementation used by list command:
-
Model#updateFilteredTaskList()— Takes in a predicate parameter and updates the model according to the predicate.
listday further implements the following operation:
-
DateSamePredicate— takes in asystemDateparameter.systemDateis aStringvalue after converting current system date intoDDMMYYformat.
listweek further implements the following operations:
-
numDaysTillSunday(dateName)— It compute the number of days from current date until closest Sunday (exclusive of Sunday) usingdateName.dateNameis the name of the current day. -
appendDateList(dateList, numDaysTillSunday(dateName))— It generates sequentialDDMMYYvalues based on the result ofnumDaysTillSunday(dateName)and inserts them intodateList.dateListis aList<String>object. -
DateWeekSamePredicate— It takes in adateListparameter.dateListis aList<String>object that contains the list of dates from current date to closest Sunday date inDDMMYYformat.
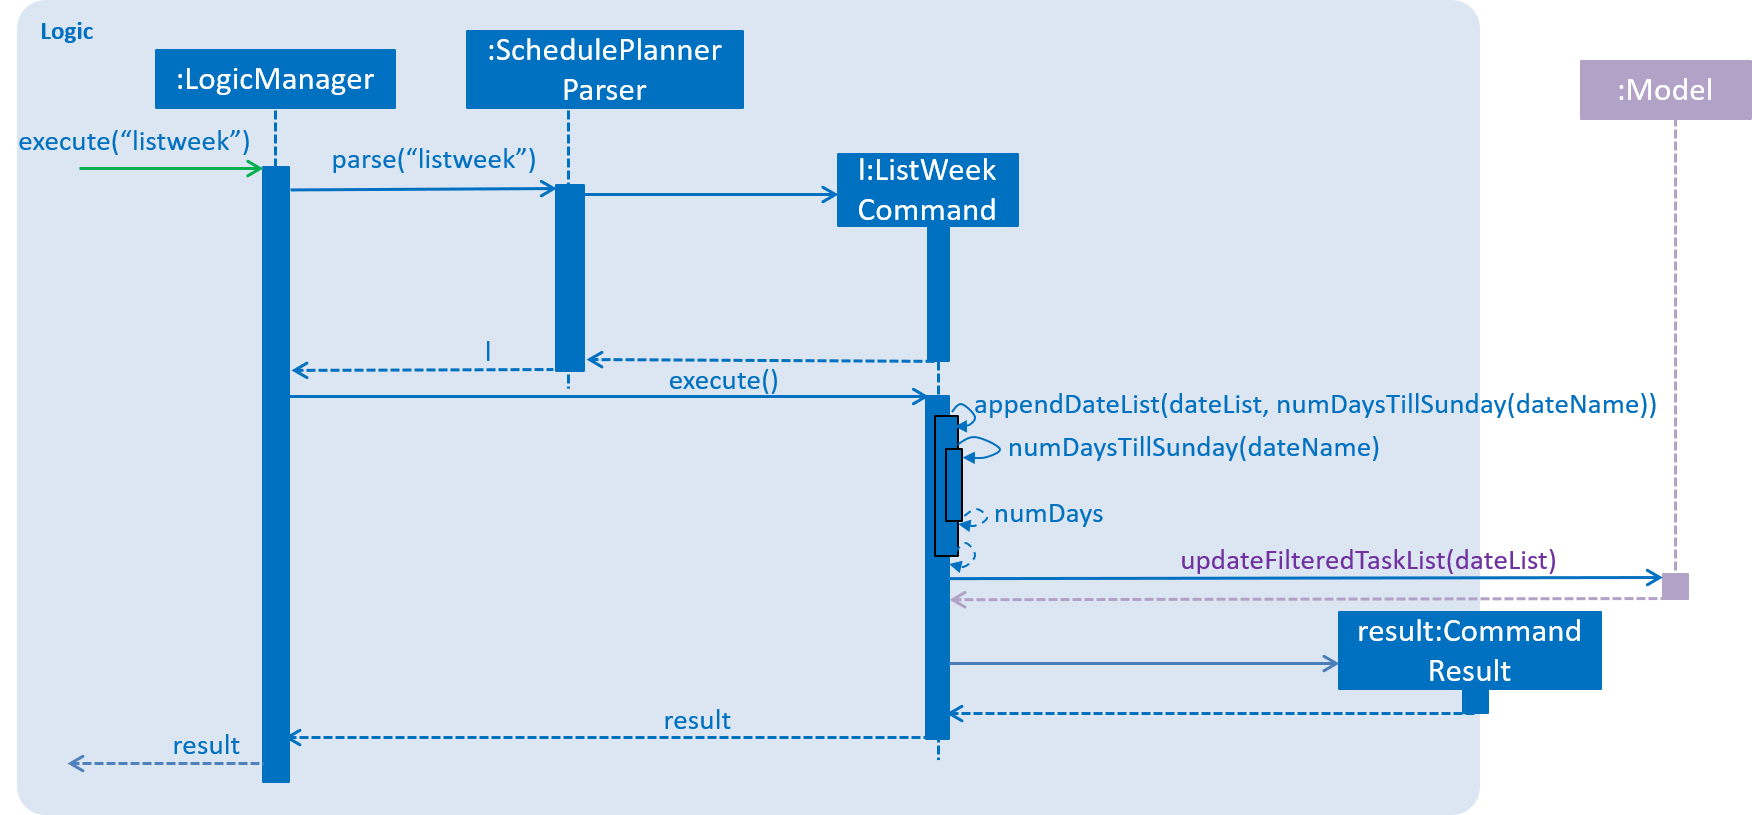
As both listday/listweek commands are similar, we will only illustrate how listweek works.
Given below is an example usage scenario and how listweek mechanism behaves at each steps:
Step 1. The user entered the command listweek.
Step 2. The command word listweek invoke LogicManger to invoke SchedulePlannerParser to return a
ListWeekCommand object. LogicManager then invoke ListWeekCommand#execute().
Step 3. ListWeekCommand#appendDateList(datelist, numDaysTillSunday(dateName)) will be activated. It helps to generates
values for dateList and the values are sequential dates in DDMMYY format after using the result from
numDaysTillSunday() method. numDaysTillSunday() will compute the number of days from current date till Sunday based on dateName,
the name of the current day.
Step 4. model.updateFilteredTaskList() will update the task list with DateWeekSamePredicate
as the parameter. DateWeekSamePredicate itself would take dateList in Step 3 as the parameter.
Step 5. The updated task list would be reflected on UI to be displayed to the user.
The following sequence diagram illustrates how the mechanism works:
4.5.2. Design Considerations
Aspect: How does listday and listweek function
-
Alternative 1 (current choice): Filter accordingly based on the command itself
-
Pros: It is easy to implement and use.
-
Cons: It restrict to view all tasks from current date or from current date till Sunday only.
-
-
Alternative 2: Allow the commands to receive argument for which date(s) to filter. E.g listday 130818 to view all tasks for 13 August 2018.
-
Pros: It allows viewing for different date(s).
-
Cons: It would cause inconvenience for entering the date(s) each time the command was to be used.
-
4.6. Archive Task
The Archive Task feature allows user to archive completed tasks. The archived tasks are hidden from task list,
can only be viewed through command listarchived. For implementation details
regarding listing archived tasks, please refer to Section 4.12, “List Archived Tasks”.
4.6.1. Current Implementation
The archiveTask mechanism is facilitated by SchedulePlanner.
Schedule Planner has two lists of tasks,
one is taskList for normal tasks, another is archivedTaskList for archived tasks.
Normal task list is implemented using UniqueTaskList that does not allow duplicates,
while archived task list is implemented using TaskList that allows duplicates.
Task list that is used to store normal tasks is implemented this way:
public class UniqueTaskList implements Iterable<Task> {
   private boolean tasksAreUnique(List<Task> tasks) {
       //... Check for duplicates logic...
   }
    //...
}
While task list that is used to store archived tasks does not check for duplicates:
public class TaskList implements Iterable<Task> {
    //...
}
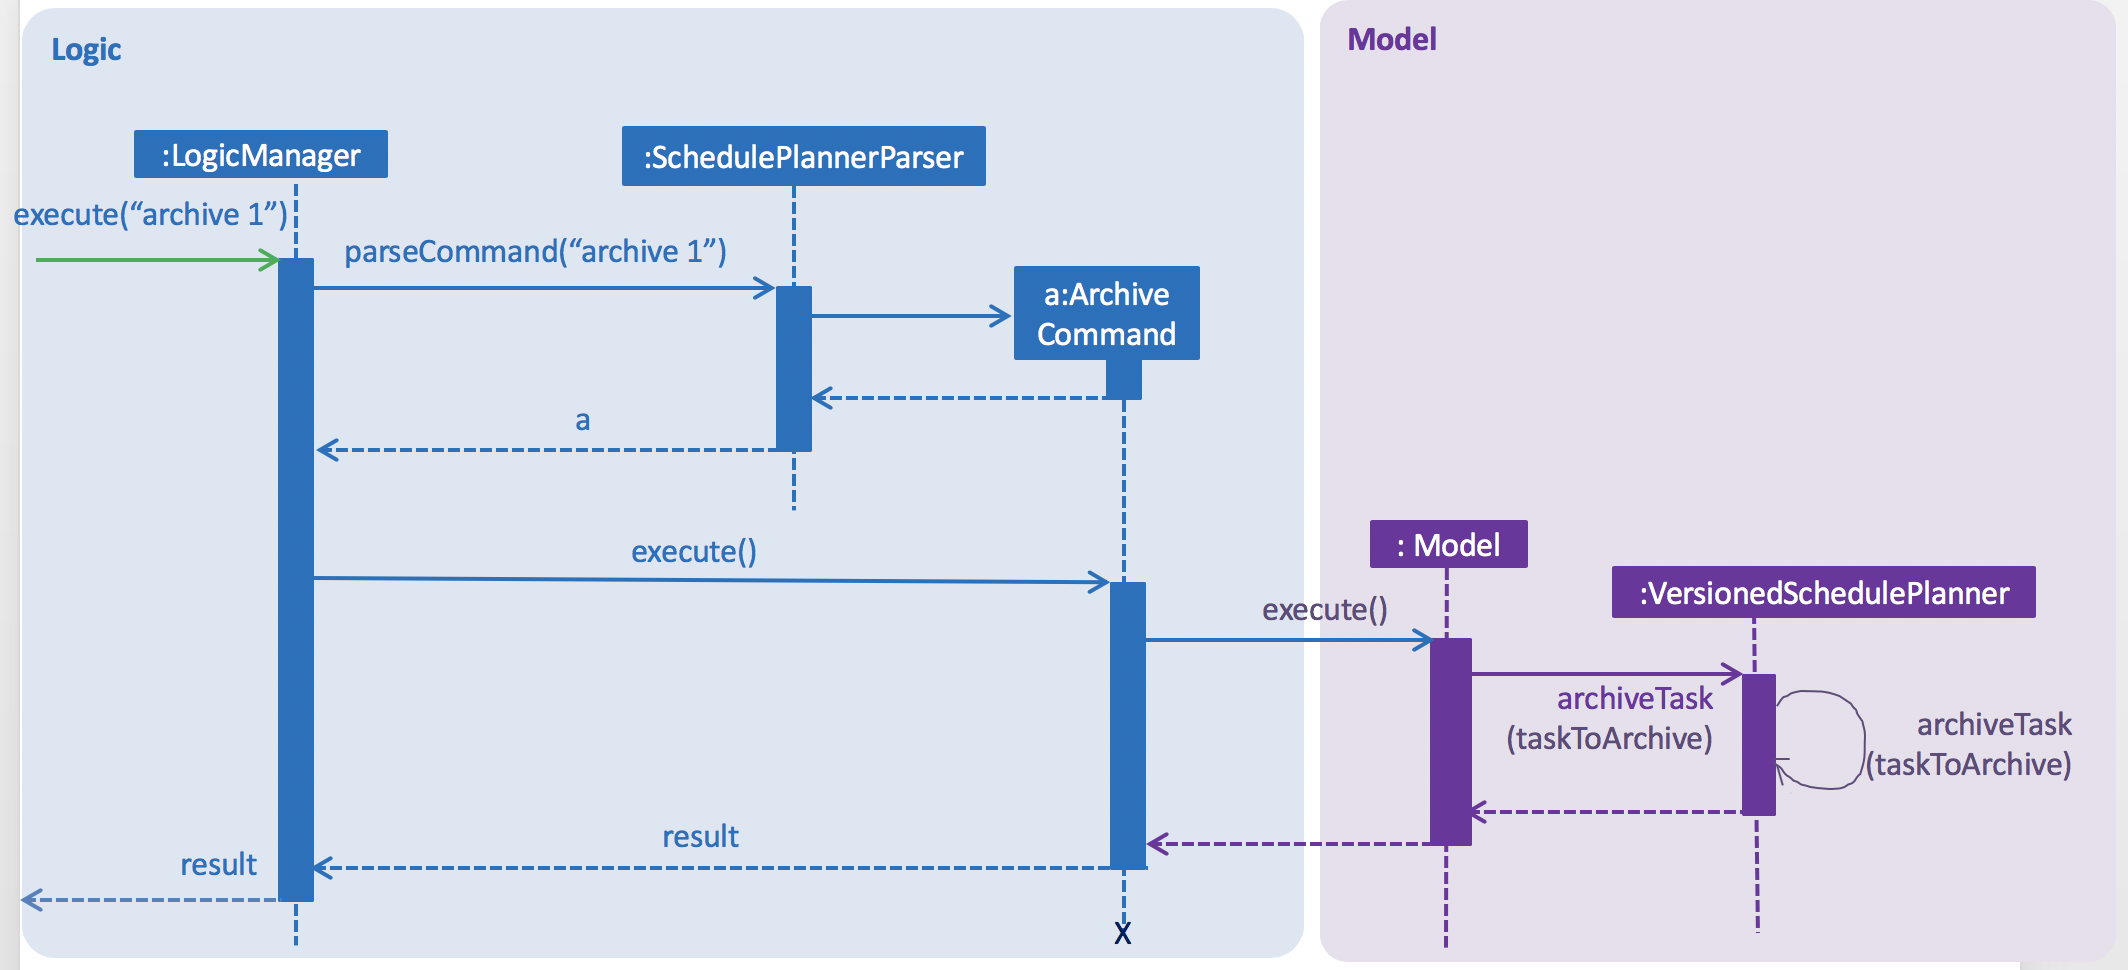
Given below is an example usage scenario and how the archiveTask mechanism behaves. We first
assume that user executes command archive 1:
-
The archiveCommand is created, 1 is recognised as
targetIndex. -
ArchiveCommand.execute()callsmodel.archiveTask()and parse intargetIndexas parameter, which is1. -
archiveTask()method in schedulePlanner class is called, which deletes the first task shown in current task list from task list and stores it into archived task list.
The following sequence diagram illustrates how the mechanism works:
4.6.2. Design Considerations
Aspect: Storage of archived tasks
-
Alternative 1 (current choice): Save archived tasks in a separate list. Implement two task lists in Schedule Planner, one for normal tasks, another for archived tasks. For archived tasks, instead of using UniqueTaskList, implement a new class that allow duplicates.
-
Pros: When listing normal tasks, the program does not have to filter out archived tasks every time; which makes the algorithm more efficient. Besides, users is able to add in new task with same attributes as an archived task, which makes the design logic more reasonable for user and more user-friendly as well.
-
Cons: Listing archived tasks will need a new approach, different from other list commands; new class has to be implemented to store archived tasks.
-
-
Alternative 2: Save archived tasks together with normal tasks. Schedule Planner only has one task list. Add boolean filed isArchived to Task class to differentiate archived and not archived tasks.
-
Pros: It is easy to implement.
-
Cons: Each time list command is called, archived tasks have to be filtered out, which may affect performance. Besides, user cannot add in new task with same attributes as archived tasks, which is much less user-friendly.
-
4.7. Automatic Partial Deletion of Archived Tasks
The automatic deletion feature removes archived tasks with deadlines date earlier than 2 weeks ago from current time
point from archived task list. There are two main reasons behind this feature.
Firstly, we want to optimize the user experience of viewing archived tasks. Users should be able to view archived tasks,
but displaying all archived tasks would make the archived task list too bulky and hard to view. In other words, we want to stop the archived task
list from growing to infinity.
Another reason is we want to save storage space used by our application as much as possible.
4.7.1. Current Implementation
Every time when the application is launched, archived list is checked through. Tasks with deadline date earlier than 2 weeks ago are then permanently deleted from archived task list.
Given below is detailed explanation of how auto-deletion mechanism behaves:
-
Application is launched
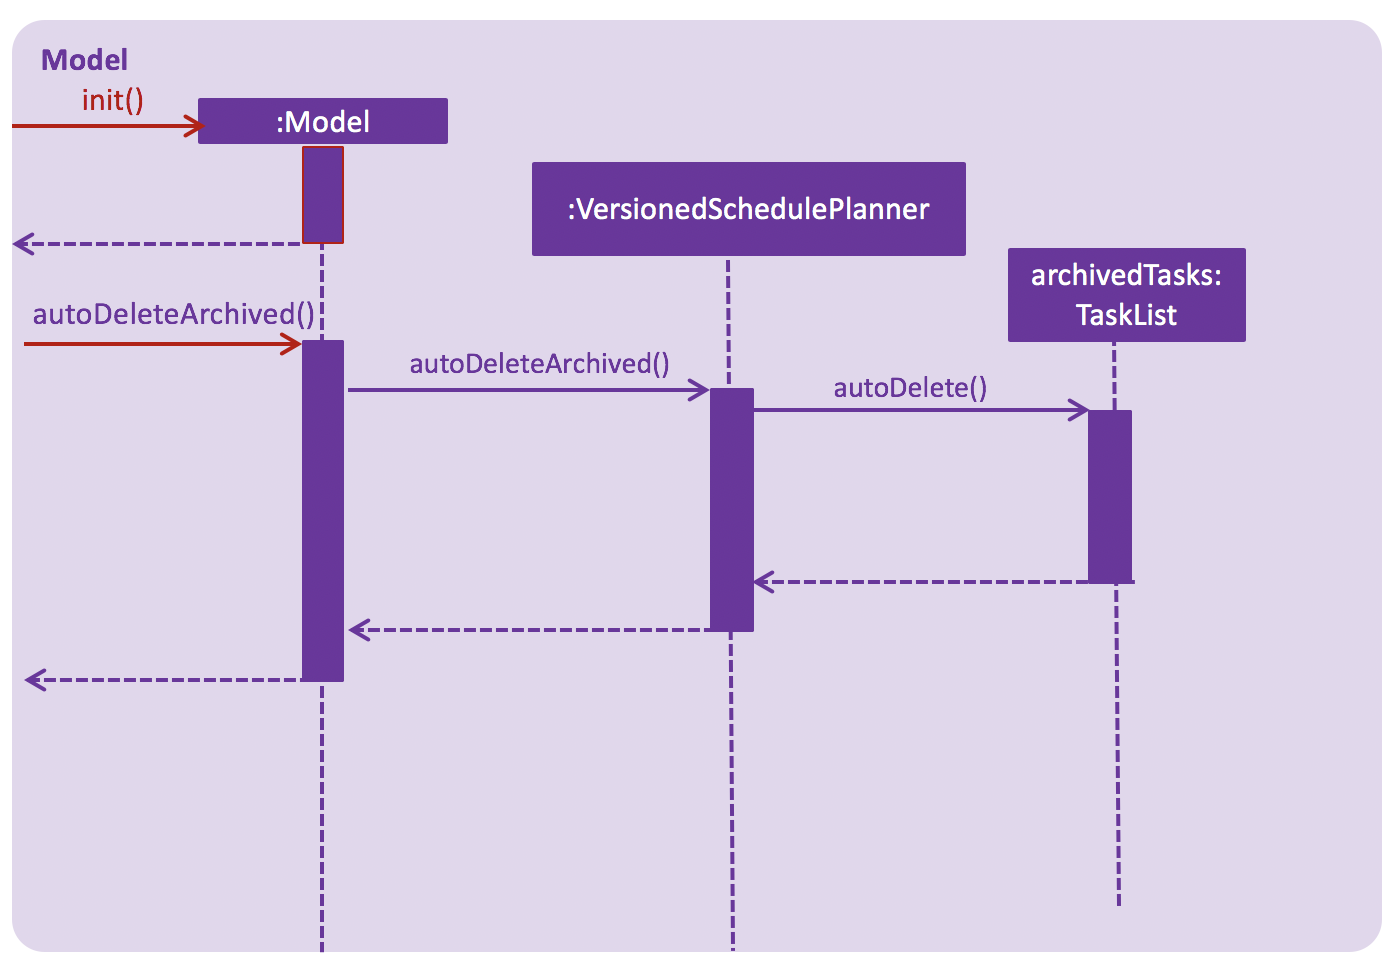
-
MainApp#init()is called, which instantiatesModelclass and callsModel#autoDeleteArchived(). -
Model#autoDeleteArchived()then callsTaskList#autoDelete(). Note thatTaskListis an object type implemented to store archived tasks.TaskList#autoDelete()then scan through archived tasks and deletes those archived tasks with deadline date earlier than 2 weeks before current time point.
4.7.2. Design Considerations
Aspect: What tasks should we delete?
We had a rough idea of deleting away "old" tasks. However, how should we define "old"?
-
Alternative 1 (current choice): Delete tasks with deadline date earlier than 2 weeks before current date.
-
Pros: This implementation is easier for testing. Testers do not have to alternate their system time to test the feature.
-
Cons: The logic may be less user-friendly comparing to Alternative 2. A user’s expectation is more likely to be "I can check tasks that were archived recently". For example, if user has just archived a task that has been overdue for 1 month (the deadline date of this task is 1 month earlier than current date), he/she may find it not so intuitive if next time he/she runs the app, the task cannot be found in archived task list.
-
-
Alternative 2 : Delete tasks that were archived 2 weeks before current date.
-
Pros: This implementation may be more user-friendly comparing with Alternative 1.
-
Cons: The feature would be hard to test for testers.
-
4.8. List Tasks by Month
The listmonth command is another variation of the list command, which supports viewing tasks due from the current
date till the end of the month.
4.8.1. Current Implementation
listmonth utilises the same implementation used by the list command:
-
Model#updateFilteredTaskList()— Takes in a predicate parameter and updates the model according to the predicate.
listmonth also utilises the same implementation used by the listweek command:
-
DateWeekSamePredicate— It takes in adateListparameter.dateListis aList<String>object that contains a list of dates from current date to the end of the month inDDMMYYformat.
listmonth further implements the following operations:
-
numDaysTillEndOfMonth(currentDay) — It computes the number of days from current date until the end of the month using
currentDay.currentDayis the current date inLocalDateformat. -
appendDateList(dateList, numDaysTillEndOfMonth(currentDay)) — It generates sequential
DDMMYYvalues based on the result ofnumDaysTillEndOfMonth(currentDay)and adds them into 'dateList` .dateListis aList<String>object.
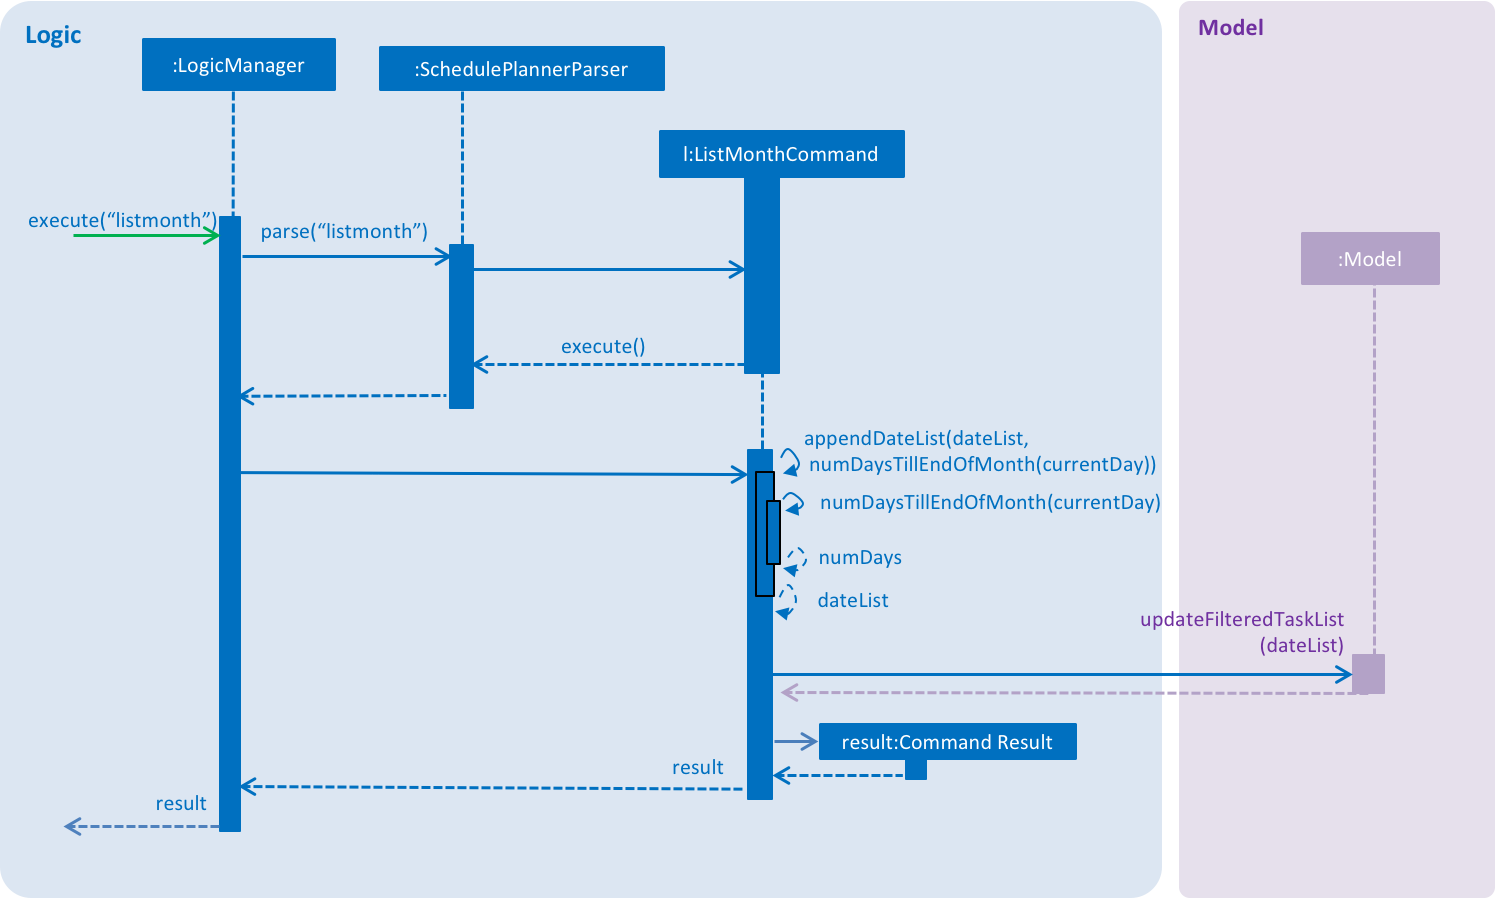
Given below is an example usage scenario and how listmonth mechanism behaves at each steps:
Step 1. The user enters the command listmonth.
Step 2. The command word listmonth invokes LogicManger, which invokes SchedulePlannerParser to return a
ListMonthCommand object. LogicManager then invokes ListMonthCommand#execute().
Step 3. ListMonthCommand#appendDateList(datelist, numDaysTillEndOfMonth(currentDay)) will be invoked. It
generates sequential dates in DDMMYY format which are added into dateList. numDaysTillEndOfMonth(currentDay)
computes the number of days from the current date till the end of the month based on currentDay. currentDay is the
current date in LocalDate format.
Step 4. model.updateFilteredTaskList() updates the task list with DateWeekSamePredicate as the predicate.
DateWeekSamePredicate takes dateList in Step 3 as its parameter.
Step 5. The updated task list would be reflected on UI to be displayed to the user.
The following sequence diagram illustrates how the mechanism works:
4.8.2. Design Considerations
Aspect: How does listmonth function
-
Alternative 1 (current choice): Fixed date interval based on commands
-
Pros: It is easier to implement, and faster for the user.
-
Cons: It may not be as flexible, as it restricts view to tasks from current date till a fixed date in the future (last day of the month)
-
-
Alternative 2: Allow
listcommands to receive arguments for start/end dates E.g list 130818 200918 to view all tasks between the two dates.-
Pros: It allows flexible viewing for different ranges.
-
Cons: It would be inconvenient to enter two date(s) each time the command is used.
-
4.9. Generate Academic Calendar Weeks
In order to enable users to better monitor their tasks in the schedule planner by knowing what is the current
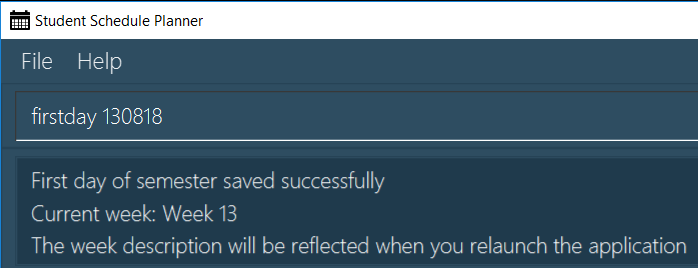
academic week, firstday command was added.
firstday command will generate the weeks referencing to NUS academic calendar, and will append the week
description to the application title if the user launches the application within the academic calendar dates.
This allows the user to know the current academic week.
| Only 17 weeks are referenced from NUS academic calendar. More details at glossary. |
4.9.1. Current Implementation
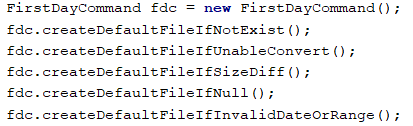
firstday mechanism is facilitated by FirstDayCommand and implements the following operations:
-
FirstDayCommand#computeRangeOfWeek(firstDay)— It generate the academic calendar weeks data based onfirstDayparameter. -
FirstDayCommand#addDescriptionForWeeks— It appends description for each academic calendar weeks. -
FirstDayCommand#saveRangeOfWeeks(rangeOfWeek)— It save the academic calendar weeks data intorangeofweek.xml -
FirstDayCommand#createDefaultFileIfNotExist()— It creates the defaultrangeofweek.xmlif it does not exist. -
FirstDayCommand#createDefaultFileIfUnableConvert()— It creates the defaultrangeofweek.xmlif data is unable to convert to be used. -
FirstDayCommand#createDefaultFileIfSizeDiff()— It creates the defaultrangeofweek.xmlif the number of entries differ from the expected academic number of weeks. -
FirstDayCommand#createDefaultFileIfNull()— It creates the defaultrangeofweek.xmlif any data is null. -
FirstDayCommand#createDefaultFileIfInvalidDateOrRange()— It creates the defaultrangeofweek.xmlif date data in modified to be an invalid date or date range format. -
FirstDayCommand#computeAppTitle()— It computes the corresponding application title after checking if current system date is within academic calendar dates. -
FirstDayCommand#retrieveRangeOfWeeks(storeRangeOfWeeks)— It retrieves the saved academic calendar weeks data fromrangeofweek.xml -
FirstDayCommand#isWithinDateRange(firstDayOfSem, lastDayOfSem)— Check if current system date is withinfirstDayOfSemandlastDayOfSemand return true or false. -
FirstDayCommand#retrieveWeekDescription(rangeOfWeek)— It return the description of a particular week -
FirstDayCommand#isMonday(inputDate)— It checks ifinputDateis Monday and return true or false.
Given below is an example usage scenario and how firstday mechanism behaves at each steps:
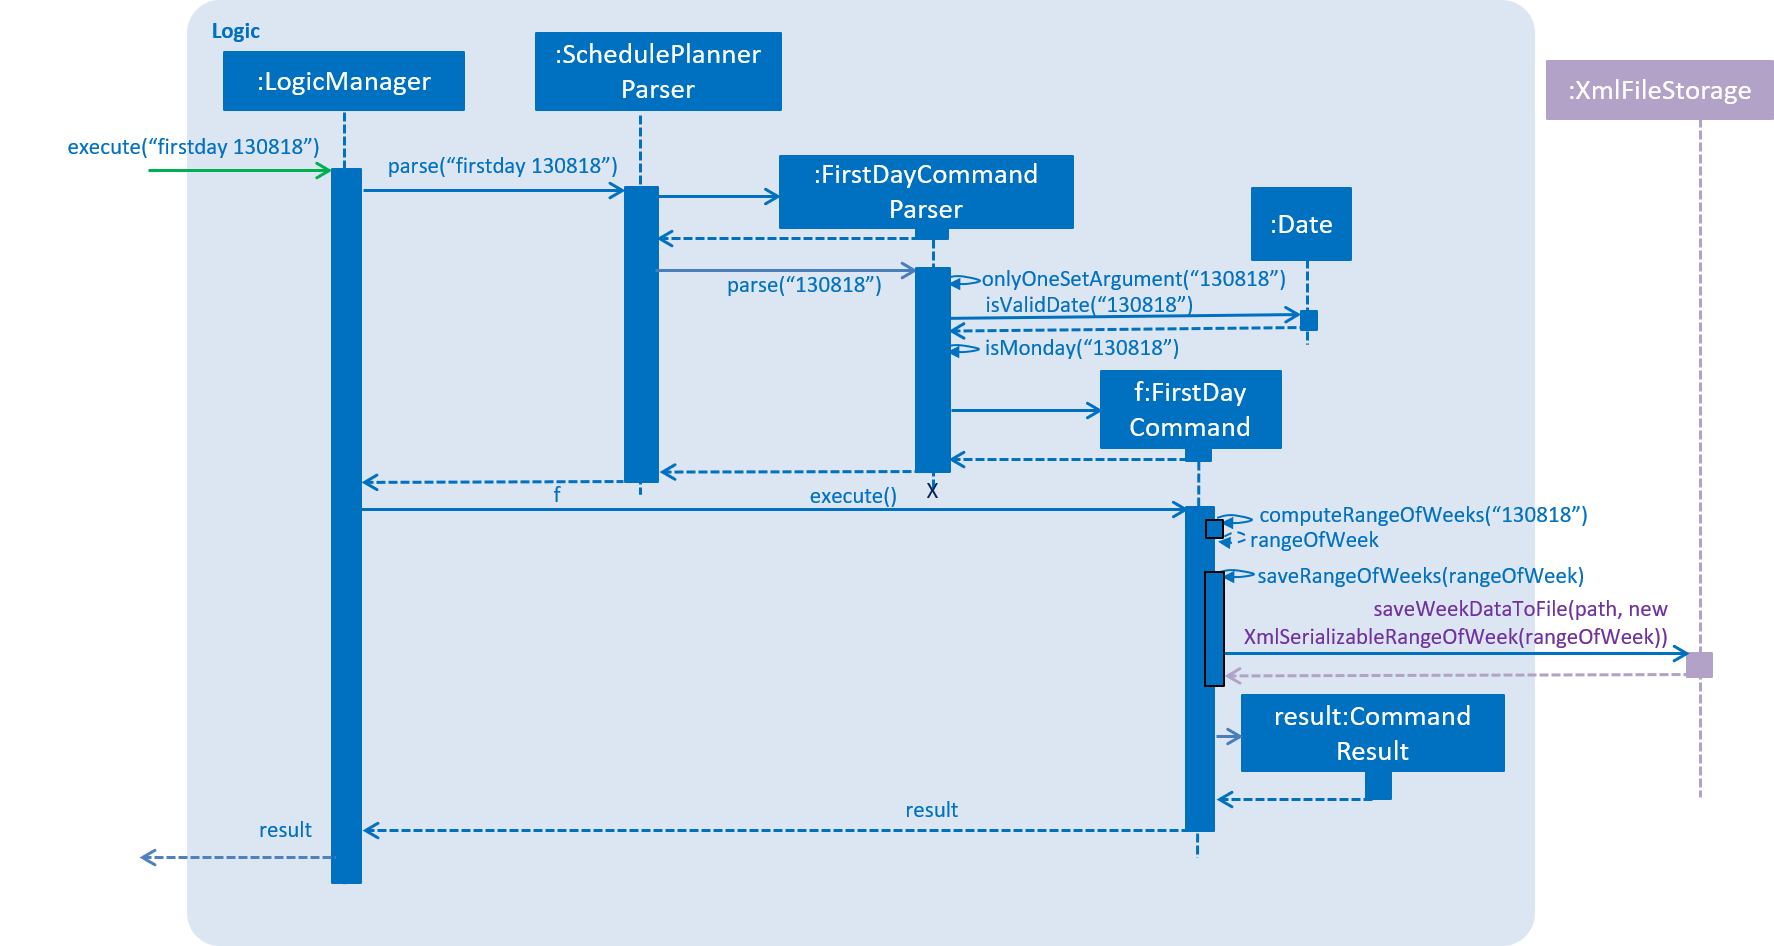
Step 1. The user enter the command firstday 130818
Step 2. The command word firstday invoke LogicManager to invoke SchedulePlannerParser. SchedulePlannerParser
then invoke FirstDayCommandParser#parse(130818) which will then trim the argument 130818 into trimmedArgs.
Step 3. Methods onlyOneSetArgument(trimmedArgs), Date#isValidDate(trimmedArgs) and isMonday(trimmedArgs) are used
in sequential order to check if trimmedArgs is valid.
If either method in Step 3 failed, ParseException with respective message will be thrown to inform user what had
gone wrong. FirstDayCommand would then not be called.
|
Step 4. FirstDayCommandParser return a FirstDayCommand with the validated trimmedArgs as its
parameter.
Step 5. LogicManager then invoke FirstDayCommand#execute().
Step 6. FirstDayCommand#computeRangeOfWeeks(trimmedArgs) will be activated and generate the academic calendar weeks
. This method will further call FirstDayCommand#addDescriptionForWeeks to add description for each of the academic
calendar weeks. The academic calendar weeks will be stored in a 2D String array named rangeOfWeek.
Step 7. FirstDayCommand#saveRangeOfWeeks(rangeOfWeek) will be activated. It will create a
XmlSerializableRangeOfWeek object with rangeOfWeek as its parameter to allow rangeOfWeek data to be
converted into Xml format to be easily saved. Next, this method would call XmlFileStorage#saveWeekDataToFile to
save XmlSerializableRangeOfWeek object data into Xml format in rangeofweek.xml
CommandException will be thrown if rangeofweek.xml does not exist.
|
Step 8. After the data had been saved properly, should the current system date lies within the academic calendar
weeks, UI would display the corresponding week description to the user.
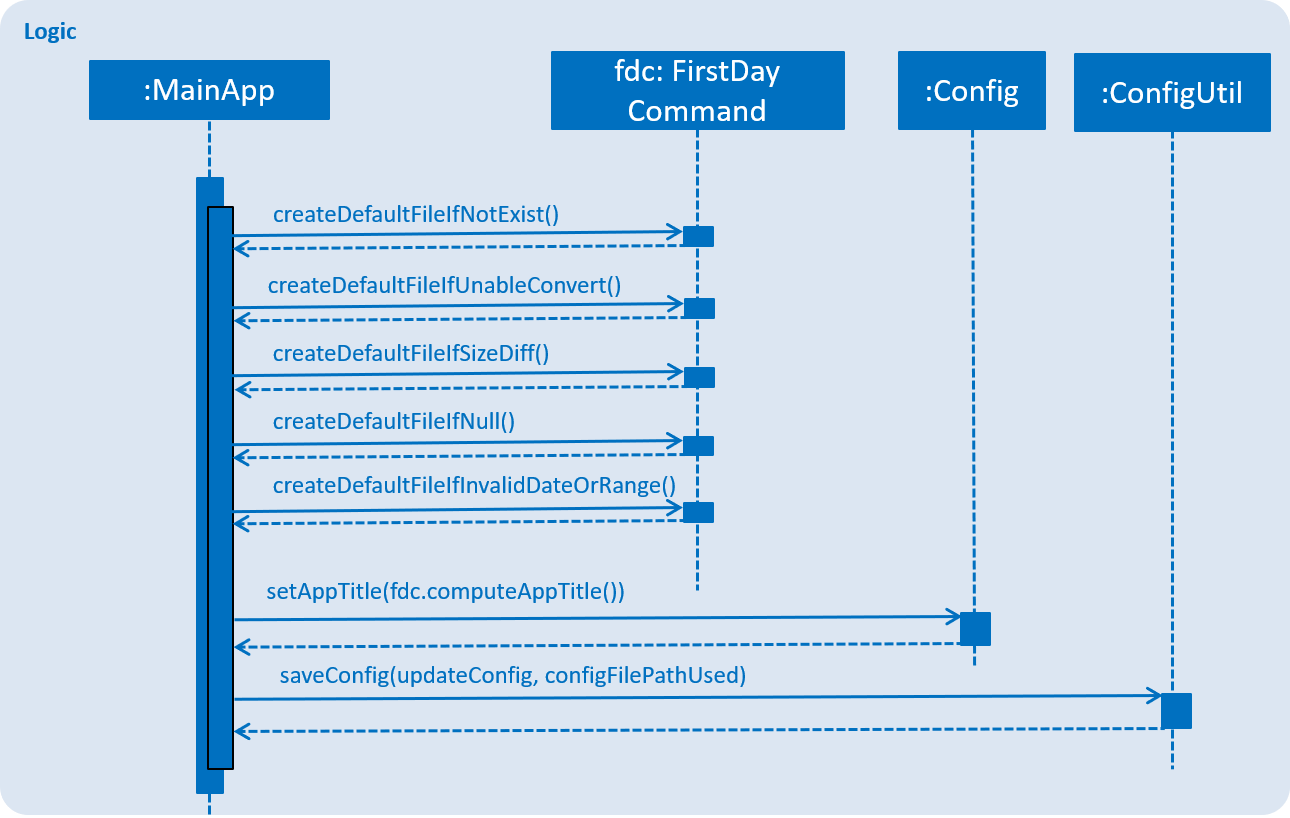
Step 9. When user launch the application,MainApp will create a FirstDayCommand object named fdc to utilise the
methods fdc#createDefaultFileIfNotExist, fdc#createDefaultFileIfUnableConvert, fdc#createDefaultFileIfDiffSize,
fdc#createDefaultFileIfNull and fdc#createDefaultFileIfInvalidDateOrRange.
If it is the first time the user launches the application or if user deleted rangeofweek.xml or invalidated data in
rangeofweek.xml, the application will record the log message and create a default rangeofweek.xml.
The following code snippet shows that with the extra layer of data verification and rectification, the user do not need to worry when they accidentally invalidated the storage file.
Step 10. MainApp will create a Config object named as updateConfig and then calls the method
updateConfig.setAppTitle(fdc.computeAppTitle()). fdc.computeAppTitle() would create a 2D String Array called
retrieveData for storing academic semester dates to operate FirstDayCommand#retrieveRangeOfWeeks(retrieveData) to
retrieve saved data.
It then check if system date is within the retrieveData by using FirstDayCommand#isWithinDateRange(x,y) where x
and y stands for the first academic and last academic day respectively. If it is within, it then generate the
corresponding application title by using FirstDayCommand#retrieveWeekDescription(retrieveData). Else it uses the
default application title. It would then return the result into updateConfig.setAppTitle() to update the
application title.
Step 11. MainApp then calls ConfigUtil#saveConfig(updateConfig, configFilePathUsed) to save the updated
configuration into the path configFilePathUsed where config.json is.
Step 12. MainApp would then retrieve the application title from config.json and display on UI.

CommandException will be thrown if data from rangeofweek.xml could not be converted or if rangeofweek.xml does
not exist.
|
The following sequence diagrams illustrates how the mechanism works:
4.9.2. Design Considerations
Aspect: How firstday command functions
-
Alternative 1 (current choice): Generate entire academic calendar weeks by input the first academic Monday date.
-
Pros: It would only need one set of date.
-
Cons: It would require many methods to validate, generate the data.
-
-
Alternative 2: Allow user to create their own academic calendar such as having customised number of weeks and description for each weeks.
-
Pros: It would allow customisation.
-
Cons: It would be time and effort consuming for the user and also to validate the data.
-
Aspect: Data structure to support storing of academic calendar weeks data
-
Alternative 1 (current choice):
2D String arrayis used.-
Pros: It would allow easy data retrieval for specific
index. -
Cons: It could cause confusion especially if magic numbers were used instead of constant.
-
-
Alternative 2:
ArrayListis used.-
Pros: It would not require sequential memory for storage.
-
Cons: It would not allow data retrieval at any specific
indexwhich requires traversing.
-
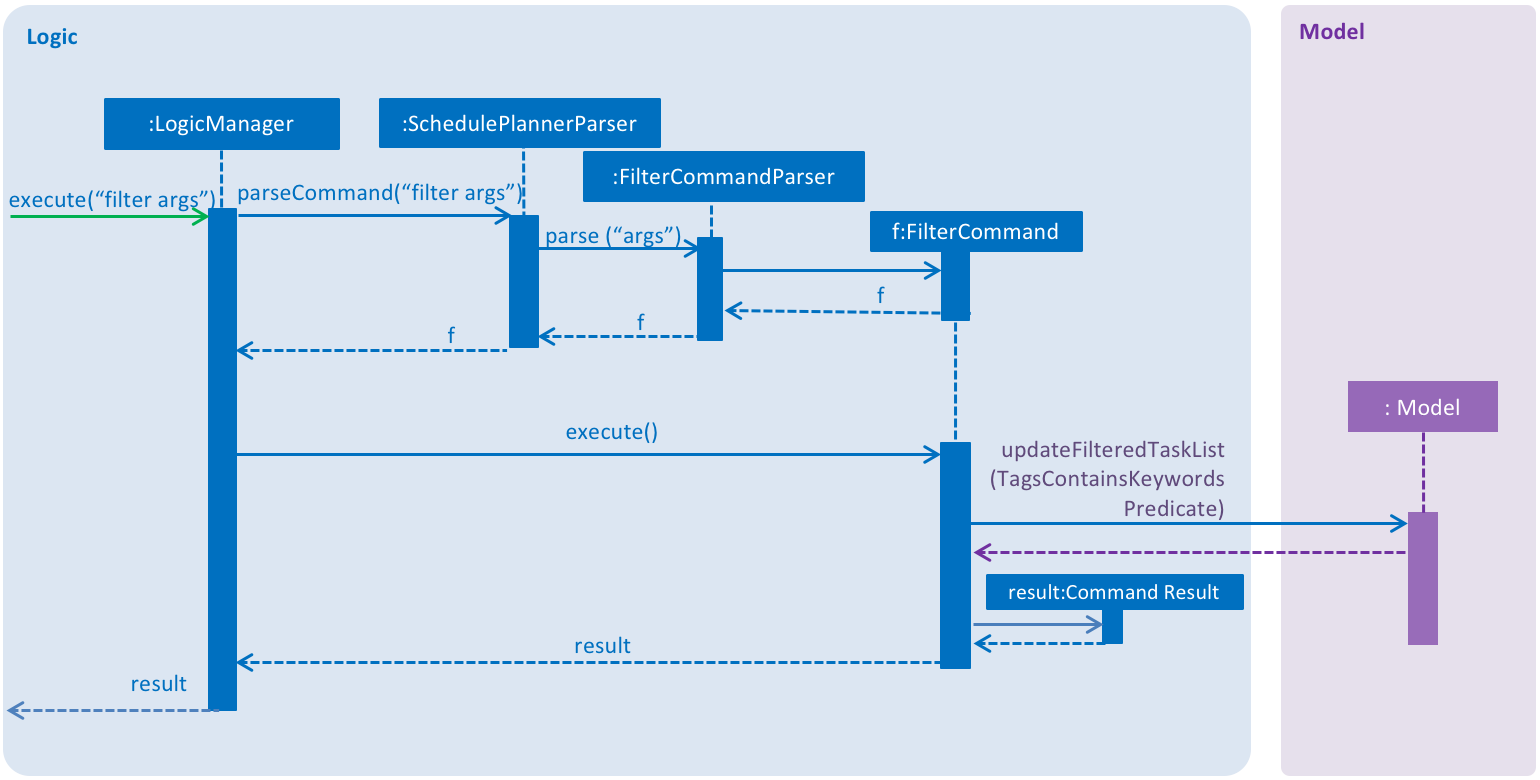
4.10. Filter by Tags (filter and filterstrict)
The filter & filterstrict commands allow the user to filter tasks in the schedule planner according to their tags.
The user may search for multiple tags at once, and the schedule planner returns a list of tasks containing the tags
specified by the user.
The filter command searches for tasks inclusively, which means that when multiple tags are input, SSP filters tasks
containing ANY of the user-input tags (e.g 'A', or 'B', or both 'A' & 'B').
In contrast, filterstrict,filters tasks containing ALL of the user-input tags. (e.g ONLY 'A' & 'B')
4.10.1. Current Implementation
Since filter and filterstrict are implemented in similar fashion, we will simply refer to filter.
The filter mechanism utilises FilterCommandParser to parse the user command into separate tags by invoking the method
FilterCommandParser.parse(args), where args are the tags to be filtered. e.g tag1 tag2 will be parsed into
tag1 and tag2.
Given below is an example usage scenario and how the filter mechanism behaves at each step:
Step 1. The user executes the command filter tutorial CS2100
Step 2. The 'filter' command invokes FilterCommandParser, which parses the argument tutorial CS2100 into separate
words tutorial and CS2100, and are stored in an array in the predicate TagsContainsKeywordsPredicate.
Step 3. FilterCommandParser then returns a FilterCommand , which contains TagsContainsKeywordsPredicate, a
predicate which tests for the tags 'tutorial' and 'CS2100'. FilterCommand.execute() calls model
.updateFilteredTaskList(TagsContainsKeywordsPredicate), which returns an updated list of tasks containing any of the
tags input by the user.
filter filters tasks inclusively, while filterstrict filters tasks exclusively.
|
The following sequence diagram summarizes what happens when a user executes a new filter command:
4.10.2. Design Considerations
Aspect: How filter executes
-
Alternative 1 (current choice): The filter command is inclusive i.e filtering for A and B returns tasks with A, B, or both.
-
Pros: It is easy to implement, it is also consistent with how the 'find' command works.
-
Cons: It is not as specific.
-
-
Alternative 2: The filter command is exclusive, i.e filtering for A and B returns tasks with A & B
-
Pros: It is more specific (e.g. filters the tasks more strictly).
-
Cons: It is inconsistent with the original implementation of the 'find' command. It is more difficult to implement.
-
4.11. List Overdue Tasks
The listoverdue command allows the user to view the list of all overdue tasks. A task is considered overdue if its
deadline has passed. In other words, the system’s current date is after the deadline.
4.11.1. Current Implementation
Given below is a code snippet of the ListOverdueCommand.
...
public CommandResult execute(Model model, CommandHistory history) {
    // Filter the task list using the OverduePredicate with the current date as the parameter.
    model.updateFilteredTaskList(new OverduePredicate(SYSTEM_DATE));
    EventsCenter.getInstance().post(new ChangeViewEvent(ChangeViewEvent.View.NORMAL));
    return new CommandResult(MESSAGE_SUCCESS);
}
...
The ListOverdueCommand calls the method updateFilteredTaskList with a new OverduePredicate which has the current date as the parameter.
public boolean test(Task task) {
    return date - task.getDate().yymmdd > 0 ? true : false;
}
The test function within OverduePredicate class compares the current system date with the date of the task. If the task’s date is after the current time, the function returns false, and vice versa.
Model contains a UniqueTaskList called tasks.
Given below is an example usage scenario and how the list overdue mechanism behaves at each step:
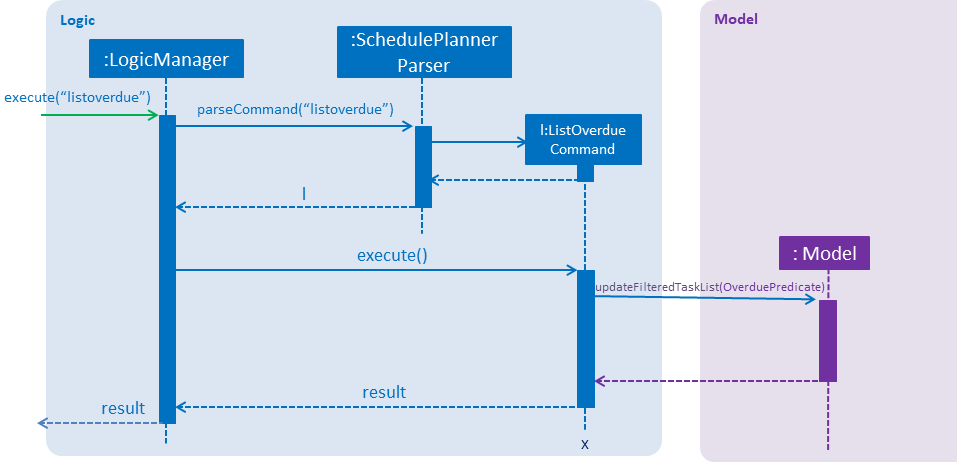
Step 1. The user executes the command listoverdue.
Step 2. model.updateFilteredTaskList() will update the task list with OverduePredicate as the parameter
OverduePredicate itself takes the current system date in the yyMMdd format.
Step 3. The updated task list would be reflected on the UI to be displayed to the user.
4.11.2. Design Considerations
Aspect: How the overdue tasks are stored
-
Alternative 1 (current choice): The overdue tasks are not stored in a separate UniqueTaskList. Instead, the UniqueTaskList tasks is filtered with OverduePredicate each time the
listoverduecommand is called.-
Pros: Does not require a new UniqueTaskList.
-
Cons: If the number of tasks is huge, filtering will take a long time. However, this is not a problem since the number of tasks is small at any given point of time.
-
-
Alternative 2: The overdue tasks are stored in a new UniqueTaskList.
-
Pros: Retrieving is overdue tasks is faster.
-
Cons: A new UniqueTaskList has to be implemented.
-
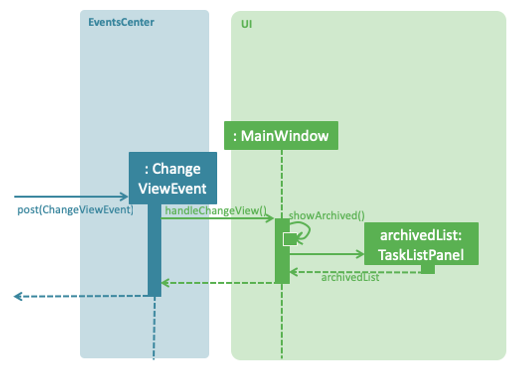
4.12. List Archived Tasks
The listarchived command allows the user to view the list of all archived tasks. Whenever the user completes a task,
he/she will archive it. When archived, the task will be moved from the task list into a separate archive list that stores
all completed tasks. If the user wishes to view all of his/her completed tasks, the listarchived command will display
all of the archived tasks.
4.12.1. Current Implementation
Model contains two UniqueTaskLists - tasks and archivedTasks - each containing the tasks and archived tasks respectively.
Given below is an example usage scenario and how the list archived mechanism behaves at each step:
Step 1. The user executes the command listarchived.
Step 2. The listarchived command raises a new ChangeViewEvent that signals a change to archived view.
Step 3. MainWindow responds to the ChangeViewEvent with MainWindow#handleChangeViewEvent().
Step 4. MainWindow calls Logic#getFilteredArchivedTaskList(). It then creates a new TaskListPanel instance with Tasks in that list.
Step 5. MainWindow places the new TaskListPanel in the TaskListPanelPlaceHolder. The archived tasks are now displayed.
The following sequence diagram shows how the list archive operation works:
4.12.2. Design Considerations
Aspect: How to change what is displayed
-
Alternative 1 (current choice): The task list panel’s contents are replaced with a new task list containing archived tasks.
-
Pros: Only one section of the UI has to be changed.
-
-
Alternative 2: Two JavaFX scenes are created. To handle display changes, switch to the corresponding scene.
-
Pros: It is the proper way of handling change in display with JavaFX.
-
Cons: Since only one section of the UI needs to be changed, changing the whole scene seems redundant.
-
4.13. Sort tasks
The sorting feature enables tasks to be displayed in the order of deadline date and priority. This feature applies to all tasks except archived tasks.
4.13.1. Current Implementation
Sorting feature does not require any user input command.
Whenever the tasks are listed, they are always listed according to deadline date, then priority. Our application offers
3 priority levels from 1 to 3, 3 is the highest priority and 1 is the lowest.
Assume there are two tasks in a task list, task A and task B. Given below is the scenario when
task list is retrieved from schedule planner using any kind of list command and how the sorting mechanism
behanves.
-
UniqueTaskList#sorted()is called andTask#compare()is parsed in as comparator. -
Task#compare()calls Date.compare(), which compares the deadline date of task A and task B.-
If task A has earlier deadline date than task B, the order will be task A followed by task B, and vice versa.
-
If task A and task B have the same deadline date,
Priority#compare()is then called, which compares priority of task A and task B.-
If task A has higher priority than task B, the order will be task A followed by task B and vice versa.
-
If task A and task B have the same priority, then
Name#compare()is called, which compares the task name of A and B according to JAVAcompareTo()method ofStringclass.
-
-
Given below is a sequence diagram of the sorting feature.

4.13.2. Design Considerations
Aspect: How should sorting be executed
-
Alternative 1 (current choice): Automatically sort tasks whenever tasks are listed. In other words, whenever tasks are shown on UI, they are sorted according to deadline and priority.
-
Pros: The user experience is better using this approach, because tasks are always listed in the order of deadline and priority. The code required is less than Alternative 2 as well.
-
Cons: The performance of the application may be affected if the task list size is significantly large, because the task list has to be traversed and sorted before displaying on UI. Of course considering actual use case, such performance issue should be negligible.
-
-
Alternative 2: Implement sort command exclusively for sorting tasks. For example, use command
sort tasksto obtain sorted list of all tasks, andsort archivedfor sorted list of archived tasks.-
Pros: We do not have to worry about performance issue.
-
Cons: Users have to type command
sortevery time, which is apparently not so user-friendly.
-
4.14. Managing Tags Using Category
The category feature enables users to organize their tags. Users can create category and
save relevant tags inside category. There are two default categories in schedule planner,
category Modules and category Others. These two default categories cannot be renamed or
deleted, but user have full freedom to rename or delete other categories added by themselves.
4.14.1. Current Implementation
Each category has a unique name, and contains a list of tags. The list of tags is implemented using UniqueTagList, which does not allow duplicates, in other words, tags with same name. Given below is a snippet of implementation of UniqueTagList:
public class UniqueTagList implements Iterable<Tag> {
    private boolean tagsAreUnique(List<Tag> tags) {
        //Checks if tags are unique...
    }
}
Given below is a snippet of implementation of category:
public class Category {
    //Two attributes, name and tag list
    private String name;
    private UniqueTagList tags;

    ///Other implementation...
}
Schedule Planner contains a list of cateogry list, implemented using UniqueCategoryList.
UniqueCategoryList is a list used to save categories which does not allow duplicates.
Any two categories with same name are considered identical. Given below is a snippet
its implementation:
public class UniqueCategoryList implements Iterable<Category> {
    public boolean contains(String name) {
        //Checks whether this category name has been used...
    }

    private boolean categoriesAreUnique(List<Category> categories) {
        //Checks whether there are duplicate categories...
    }
    //Other implementation...
}
Given below is an example usage scenario and how the category mechanism behaves at each step:
Step 1. User enters command addcat c/Game list to add a category named Game list.
-
The
addcatcommand is executed.AddCategoryCommand#execute()callsModel#addCategory(). -
Model#addCategory()callsVersionedSchedulePlanner#addCategory(). -
SchedulePlanner#addCategory()then callsUniqueCategoryList#add(). -
UniqueCategoryList#add()checks if the existing category list contains any category with identical name as new category, if exists,DuplicateCategoryException()is thrown; if not, new category is created and added to category list.
Given below is the sequence diagram of add category command which explains how the mechanism works:
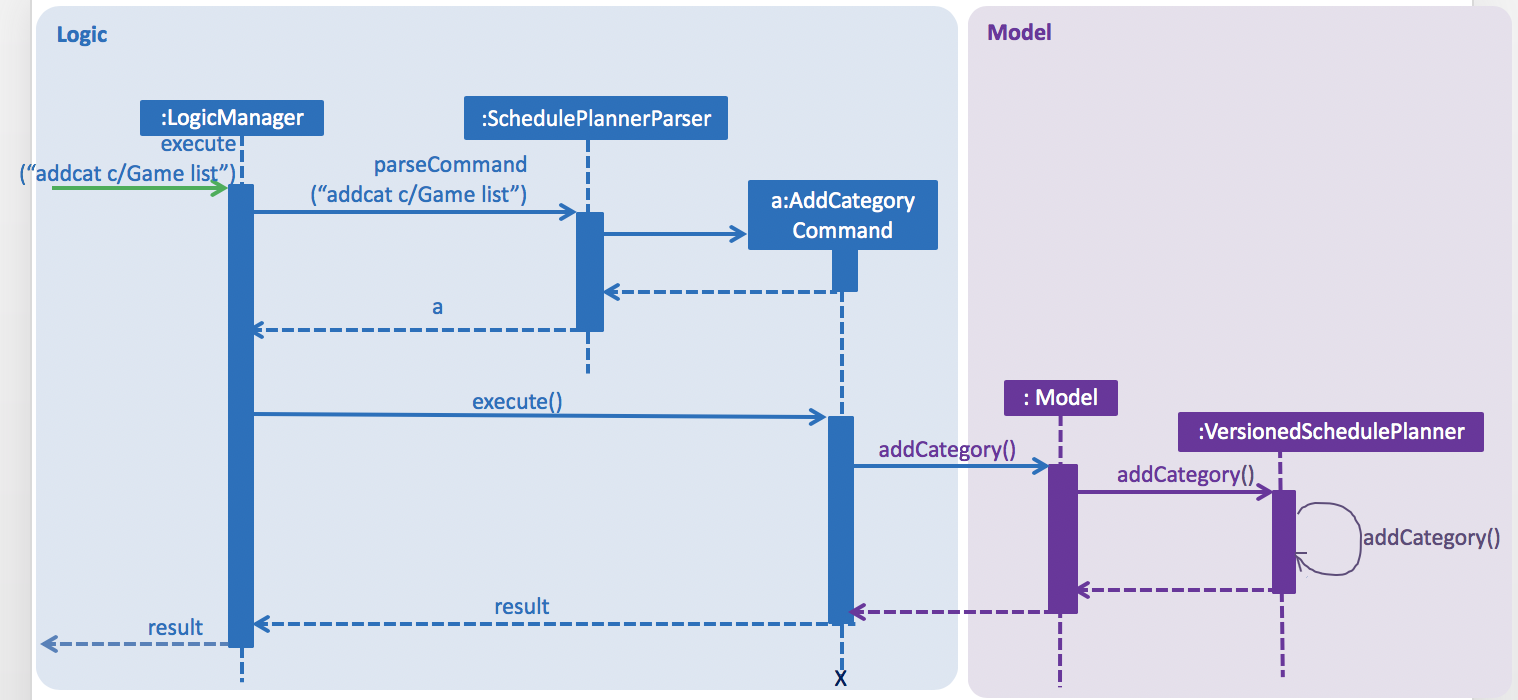
When user is adding tasks using unspecified tags (tags that have never been added to any category),
the tags will be automatically added to default category Others.
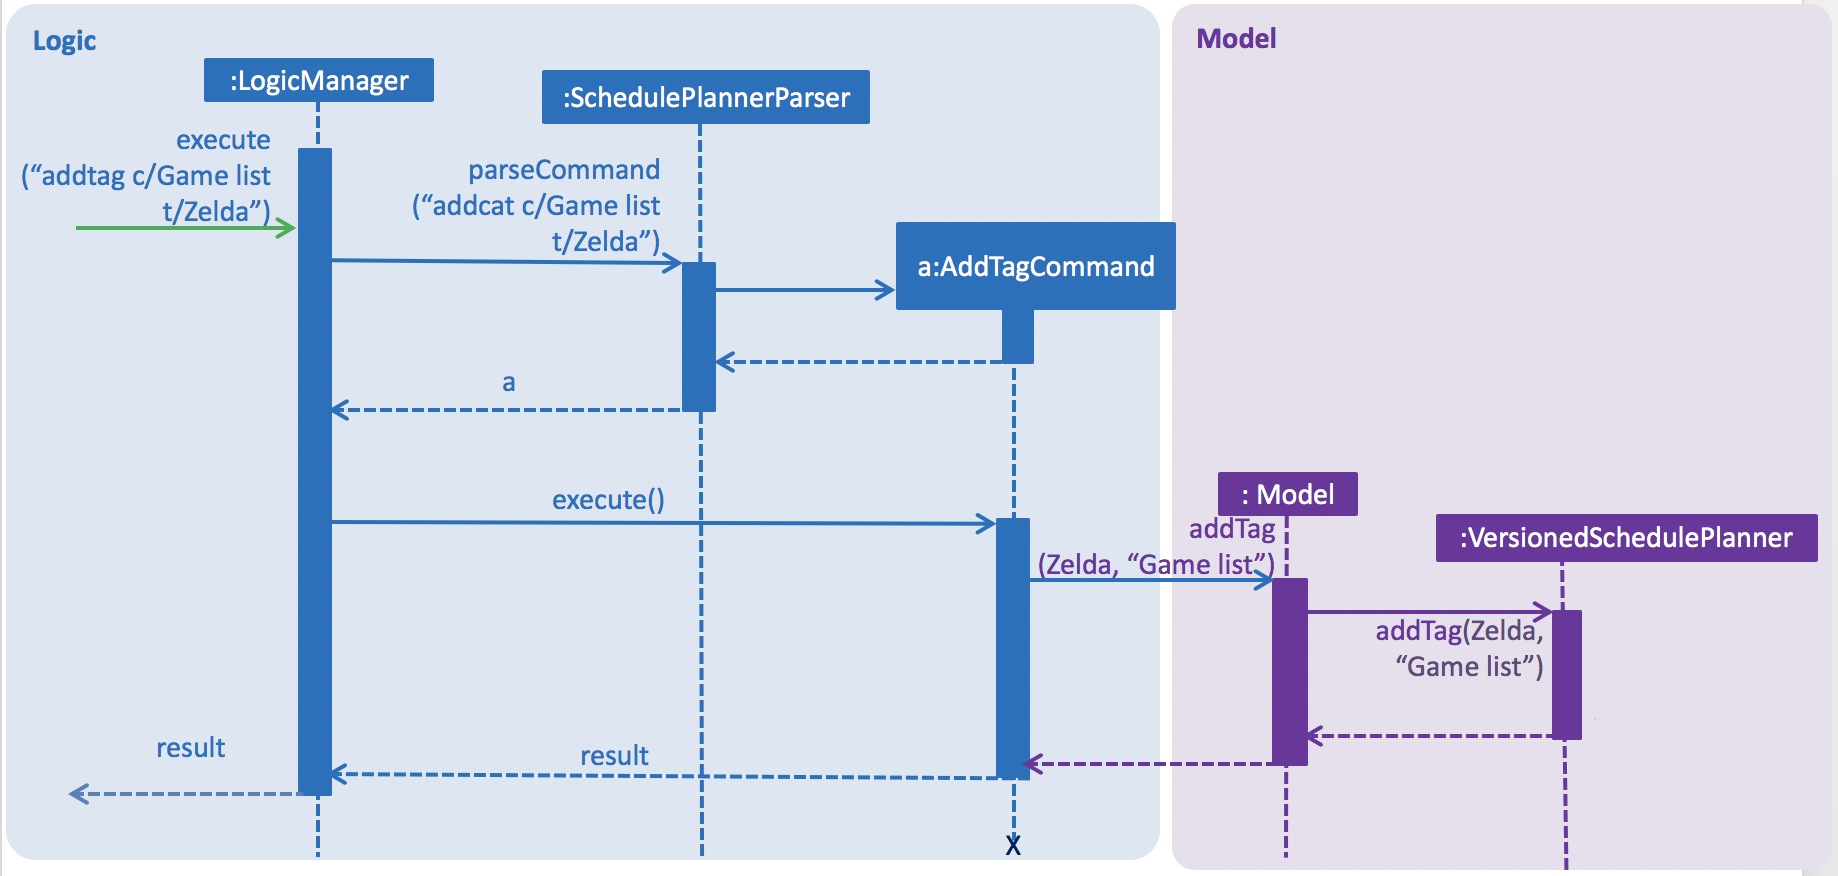
Step 2. User enters command addtag c/Game list t/Zelda to add tag Zelda into category Game list.
-
The command string is first passed to
AddTagCommandParser, which parses stringZeldato tag (let us call ittagZelda) and createsAddTagcommand. -
The command is then executed.
AddTagCommand#execute()callsModel#addTag()and passestagZeldaand stringGame listas parameter. -
Model#addTag()callsVersionedSchedulePlanner#addTag(), passes intagZeldaand stringGame listas parameter. -
VersionedSchedulePlanner#addCategory()then callsUniqueCategoryList#getCategory(), passing in stringGame listas parameter and obtains corresponding category (let us call itcategoryGameList). -
Category#addTag()is then called with parametercategoryGameListto add tagtagZeldato categorycategoryGameList. If there already exists a tag namedZeldain UniqueTagList of categorycategoryGameList, exceptionDuplicateTagExceptionis thrown.
Given below is the sequence diagram of add tag command.
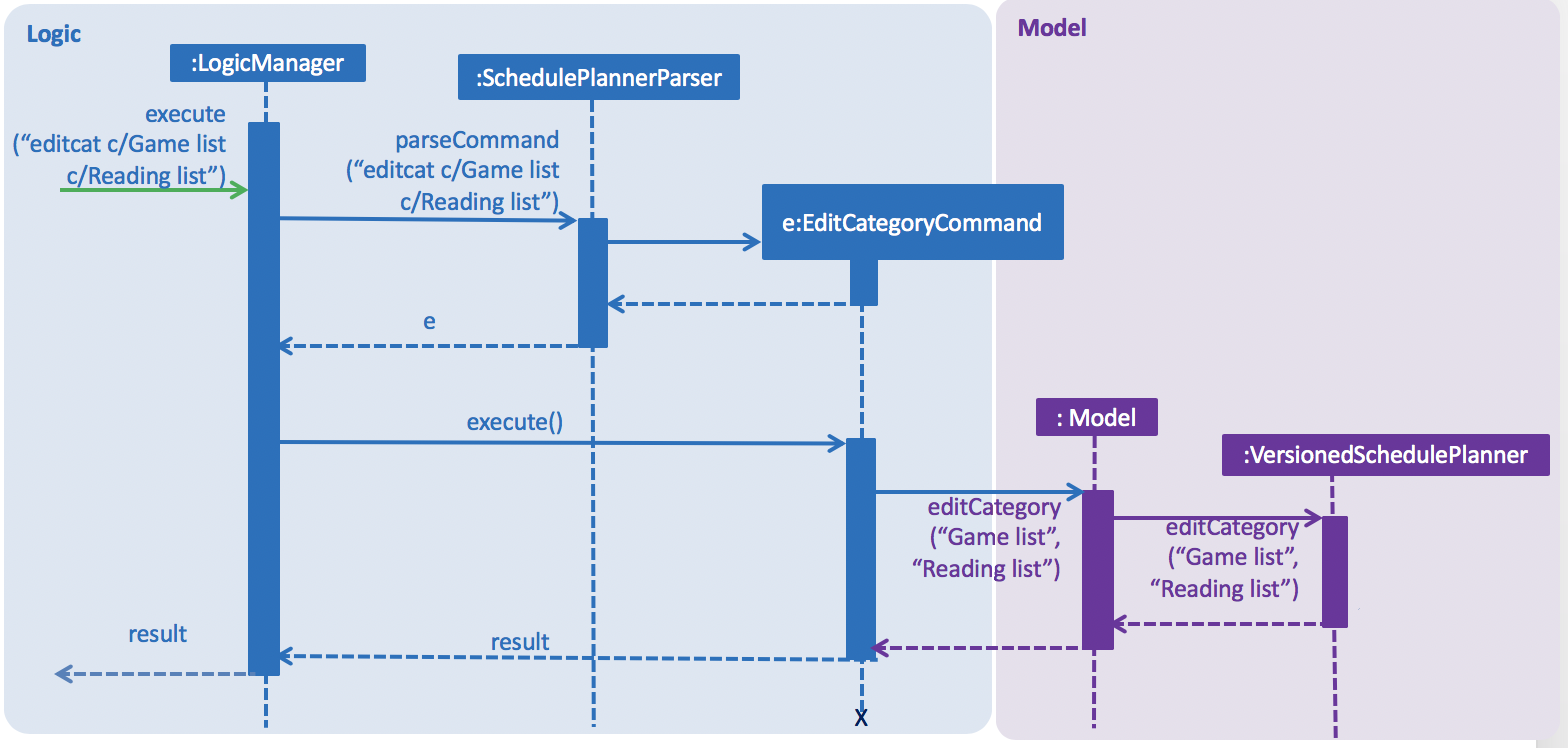
Step 3. User enters command editcat c/Game list c/Reading list to rename category from Game list to Reading list.
-
EditCategoryCommandParsercreatesEditCategoryCommand. WhenEditCategoryCommandexecutes, it callsModel#editCategory()and passes in stringGame listand stringReading listas parameter. -
Model#editCategory()callsVersionedSchedulePlanner#editCategory()with parameter stringGame listand stringReading list. -
VersionedSchedulePlannerthen callsUniqueCategoryList#setCategory()to obtain the category namedGame list(let us call itcategoryGameList) and create a new category with nameReading listand same tag list as categorycategoryGameList, replace categorycategoryGameListwith this new category. Below is a snippet of implementation ofUniqueCategoryList#setCategory()used here:
    public void setCategory(String originalName, String newName) {
        //...
        //Obtain the category with name "Game list"
        Category oldCategory = getCategory(originalName);
        //Creat a new category which is identical to original category except name
        Category newCategory = new Category(newName, oldCategory.getUniqueTagList());
        internalList.set(internalList.indexOf(oldCategory), newCategory);
    }
Given below is the sequence diagram of edit category command:
-
Sequence Diagram of Edit Category Command
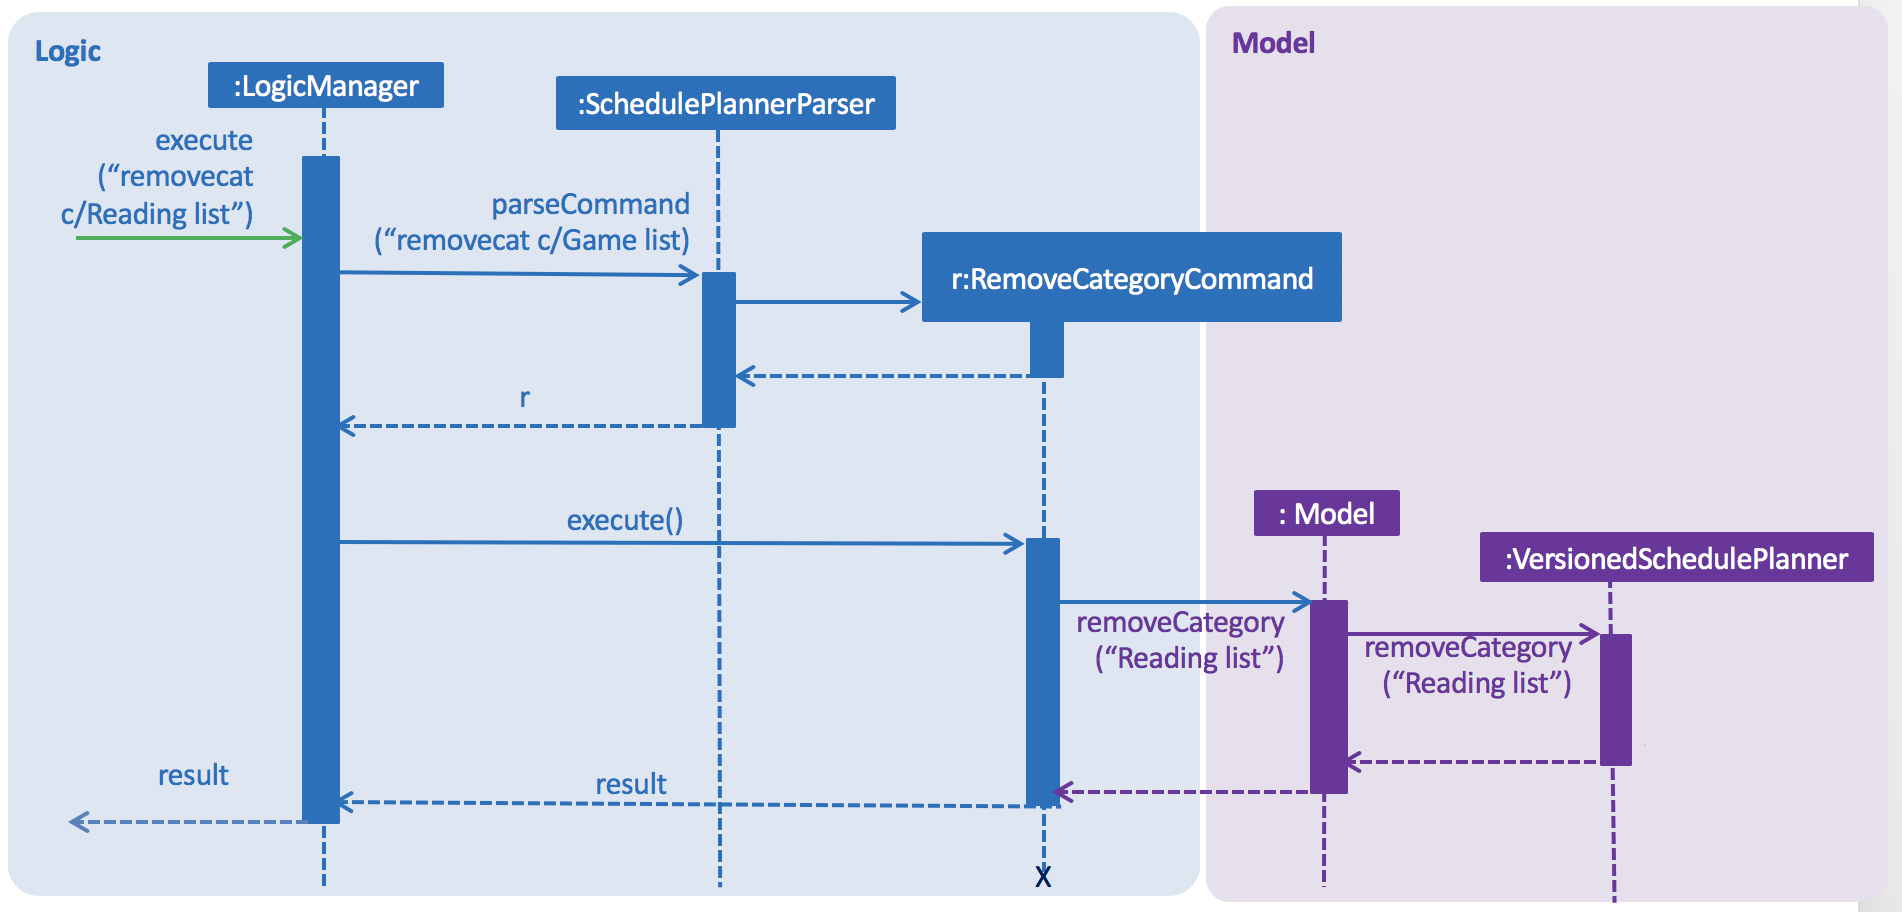
Step 4. User enters command removecat c/Reading list to remove the category named Reading list. Let us call this
category categoryReadingList.
-
RemoveCategoryCommandParsercreatesRemoveCategoryCommand. -
When
RemoveCategoryCommandexecutes, it callsModel#removeCategory()and passes in stringReading listas parameter. -
Model#removeCategory()callsVersionedSchedulePlanner#removeCategory()with parameter stringReading list. -
VersionedSchedulePlannerthen callsUniqueCategoryList#removeCategory()to obtain category namedReading list(let us call itcategoryReadingList) and remove it. -
After
categoryReadingListis removed, its tag list is removed as well. For example, if user has added tagZeldaonly in category namedReading list, then after removing this category, tagZeldawill be lost from schedule planner.
Given below is the sequence diagram of remove category command:
Besides adding tag, renaming (editing) and removing, we support clearing category as well.
Clear category command clears the tags list of selected category.
Mechanism of clearing category is very similar to renaming (editing) category.
Model#clearCategory() calls VersionedSchedulePlanner#clearCategory(), which then initialize a new empty
category with name "Modules".
Below is a code snippet of VersionedSchedulePlanner#clearCategory():
    public void clearCategory(String name) {
        //...
        this.categories.setCategory(name, new Category(name));
    }
Below is a code snippet of #UniqueCategoryList#setCategory()` used here, which is slightly different from what is used in editing category:
    public void setCategory(String originalName, Category newCategory) {
        //...
        Category oldCategory = getCategory(originalName);
        internalList.set(internalList.indexOf(oldCategory), newCategory);
    }
We omit the sequence diagram here because of its similarity to edit category command.
4.14.2. Design Consideration
Aspect: How to store and manage tags
-
Alternative 1 (current choice): Store Categories as
UniqueCategoryListand allow users to add tags to categories. There will be noUniqueTagListdirectly managed by schedule planner. All tags are saved under UniqueTagList under individual Category. Because our application is catered for university students, we set two default categories,ModulesandOthers.-
Pros: We allow users more freedom to manipulate with their tags and categorize their tags. User can add one tag to several categories, and the tags saved under different categories do not interfere with each other. This is the most user-friendly design we can think of so far.
-
Cons: The implementation is more complicated than Alternative 2. Besides, this mechanism requires more commands to operate, which could be harder for user to remember.
-
-
Alternative 2: Store tags in
UniqueTagListdirectly managed by schedule planner. The schedule planner has two tag lists, one isModulesand another one isOthers.-
Pros: It is easy to implement, and the operation requires less commands.
-
Cons: User has less freedom in managing tags. This design is less user-friendly than Alternative 1.
-
4.15. Display Tags in Sidebar
Whenever the user tags a task with a new tag, the tag will be added to the sidebar panel. The user will be able to view all of the tags he/she has used to categorize tasks. Entering the command tags c/CATEGORY will expand the tab for the specified category to show all tags listed under that category.
4.15.1. Current Implementation
Every time any category or tag is changed in the Student Schedule Planner, it raises a SchedulePlannerChangedEvent. The UI will then handle that event and update the side bar panel with the new version of categories and tags.
Given below is an example usage scenario and how the schedule planner behaves at each step:
Step 1. The user executes command addtag c/Modules t/CS2100.
Step 2. The addtag command updates the model with the new tag and raises a new SchedulePlannerChangedEvent.
Step 3. SidebarPanel responds to the SchedulePlannerChangedEvent with SidebarPanel#handleSchedulePlannerChangedEvent().
Step 4. The Accordion containing all the categories and tags is cleared.
Step 5. The Accordion is filled with the new list of updated categories and tags.
Step 6. The user executes command tags c/Modules.
Step 7. The ShowTagsCommand raises a new ShowTagsRequestEvent("Modules").
Step 8. SidebarPanel responds to the ShowTagsRequestEvent with SidebarPanel#handleShowTagsRequestEvent().
Step 9. The TitledPane with the matching name "Modules" is expanded to display all the tags listed under the Modules category.
Below is a code snippet showing how the SidebarPanel handles a ShowTagsRequestEvent:
@Subscribe
    public void handleShowTagsRequestEvent(ShowTagsRequestEvent e) {
        String catName = e.getCategory();
        ObservableList<TitledPane> titledPanes = accordion.getPanes();
        for (TitledPane titledPane : titledPanes) {
            if (titledPane.getText().equals(catName)) {
                accordion.setExpandedPane(titledPane);
            }
        }
    }
4.15.2. Design Considerations
Aspect: How to update the tags on UI
-
Alternative 1 (current choice): Clear all the TitledPanes and add new TitledPanes accordingly.
-
Pros: No matter which category or tag is changed, or what type of change (ie. delete, add, or edit), this change can be handled by the same method each time.
-
Cons: It is redundant to clear everything and replace them with new TitledPanes.
-
-
Alternative 2: Handle different kinds of changes to the category or tag lists.
-
Pros: It is a lot faster to only change the TitledPane that is affected.
-
Cons: There are too many cases for how the lists can be changed. (ie. a different change is needed for each of these cases: category is deleted/edited/created/cleared, or a tag is deleted/added)
-
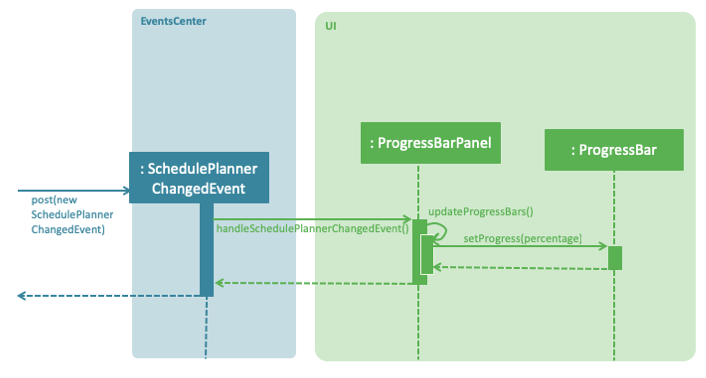
4.16. Display Progress Bars
The progress bars for today’s progress and this week’s progress at the bottom reflect the percentages automatically when the schedule planner is changed in any way.
4.16.1. Current Implementation
Whenever the user makes a change in the schedule planner, for example add, delete, or archive a task, it raises a new SchedulePlannerChangedEvent. UI part ProgressBarPanel will handle this event and update the values for both today and this week’s progress bars.
Given below is an example usage scenario and how the progress bar mechanism behaves at each step:
Step 1. User archives a Task due today.
Step 2. A new SchedulePlannerChangedEvent is raised.
Step 3. ProgressBarPanel handles the event with ProgressBarPanel#handleSchedulePlannerChangedEvent().
Step 4. The taskList is retrieved by SchedulePlannerChangedEvent#data.getTaskList(). The archivedTaskList is retrieved by SchedulePlannerChangedEvent#data.getArchivedTaskList().
Step 5. ProgressBarPanel#updateProgressBars(taskList, archivedTaskList) is called.
Step 6. After filtering through each lists with the DateSamePredicate, their sizes are calculated.
Step 7. The number of completed tasks for today is the size of the filtered archived list, while the total number of tasks for today is the size of both the filtered archived list and the filtered task list.
Step 8. The fraction is calculated from completed / total. Then the progress bar for today is set to that fraction.
Step 9. The same is done for this week’s progress bar but the lists are filtered with DateWeekSamePredicate.
The following sequence diagram shows how the progress bar mechanism works:
4.16.2. Design Considerations
Aspect: How the percentages are calculated
-
Alternative 1 (current choice): Calculate the percentage of progress by finding the size of filtered task list and filtered archived list.
-
Pros: It is easy to implement.
-
Cons: It may be slow if the task list and archived task list are very long.
-
-
Alternative 2: Keep track of number of uncompleted and completed tasks in new Objects called Day and Week.
-
Pros: It is much faster to calculate the percentage compared to filtering each task list by a predicate then calculating its size.
-
Cons: The Day and Week objects must be updated for a majority of the commands the app supports. If I had more time, I would have been able to implement this fully.
-
5. Documentation
We used asciidoc for writing documentation.
| We chose asciidoc over Markdown because asciidoc, although a bit more complex than Markdown, provides more flexibility in formatting. |
5.1. Editing Documentation
See UsingGradle.adoc to learn how to render .adoc files locally to preview the end result of your edits.
Alternatively, you can download the AsciiDoc plugin for IntelliJ, which allows you to preview the changes you have made to your .adoc files in real-time.
5.2. Publishing Documentation
See UsingTravis.adoc to learn how to deploy GitHub Pages using Travis.
5.3. Converting Documentation to PDF format
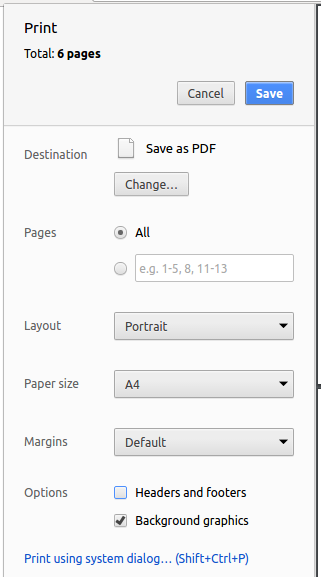
We use Google Chrome for converting documentation to PDF format, as Chrome’s PDF engine preserves hyperlinks used in webpages.
Here are the steps to convert the project documentation files to PDF format:
-
Follow the instructions in UsingGradle.adoc to convert the AsciiDoc files in the
docs/directory to HTML format. -
Go to your generated HTML files in the
build/docsfolder, right click on them and selectOpen with→Google Chrome. -
Within Chrome, click on the
Printoption in Chrome’s menu. -
Set the destination to
Save as PDF, then clickSaveto save a copy of the file in PDF format. For best results, use the settings indicated in the screenshot below.
5.4. Site-wide Documentation Settings
The build.gradle file specifies some project-specific asciidoc attributes which affects how all documentation files within this project are rendered.
Attributes left unset in the build.gradle file will use their default value, if any.
|
| Attribute name | Description | Default value |
|---|---|---|
|
The name of the website. If set, the name will be displayed near the top of the page. |
not set |
|
URL to the site’s repository on GitHub. Setting this will add a "View on GitHub" link in the navigation bar. |
not set |
|
Define this attribute if the project is an official SE-EDU project. This will render the SE-EDU navigation bar at the top of the page, and add some SE-EDU-specific navigation items. |
not set |
5.5. Per-file Documentation Settings
Each .adoc file may also specify some file-specific asciidoc attributes which affects how the file is rendered.
Asciidoctor’s built-in attributes may be specified and used as well.
Attributes left unset in .adoc files will use their default value, if any.
|
| Attribute name | Description | Default value |
|---|---|---|
|
Site section that the document belongs to.
This will cause the associated item in the navigation bar to be highlighted.
One of: * Official SE-EDU projects only |
not set |
|
Set this attribute to remove the site navigation bar. |
not set |
5.6. Site Template
The files in docs/stylesheets are the CSS stylesheets of the site.
You can modify them to change some properties of the site’s design.
The files in docs/templates controls the rendering of .adoc files into HTML5.
These template files are written in a mixture of Ruby and Slim.
|
Modifying the template files in |
6. Testing
6.1. Running Tests
There are three ways to run tests.
| The most reliable method is Method 3. The first two methods might fail some GUI tests due to platform/resolution-specific idiosyncrasies. |
Method 1: Using IntelliJ JUnit test runner
-
To run all tests, right-click on the
src/test/javafolder and chooseRun 'All Tests' -
To run a subset of tests, you can right-click on a test package, test class, or a test and choose
Run 'ABC'
Method 2: Using Gradle
-
Open a console and run the command
gradlew clean allTests(Mac/Linux:./gradlew clean allTests)
| See UsingGradle.adoc for more info on how to run tests using Gradle. |
Method 3: Using Gradle (headless)
Thanks to the TestFX library we use, our GUI tests can be run in the headless mode. In the headless mode, GUI tests do not show up on the screen. That means the developer can do other things on the Computer while the tests are running.
To run tests in headless mode, open a console and run the command gradlew clean headless allTests (Mac/Linux: ./gradlew clean headless allTests)
6.2. Types of tests
We have two types of tests:
-
GUI Tests - These are tests involving the GUI. They include:
-
System Tests that test the entire App by simulating user actions on the GUI. These are in the
systemtestspackage. -
Unit tests that test the individual components. These are in
ssp.scheduleplanner.uipackage.
-
-
Non-GUI Tests - These are tests not involving the GUI. They include:
-
Unit tests that target the lowest level methods/classes.
e.g.ssp.scheduleplanner.commons.StringUtilTest -
Integration tests that check the integration of multiple code units (those code units are assumed to be working).
e.g.StorageManagerTest -
Hybrids of unit and integration tests. These tests check multiple code units as well as how the are connected together.
e.g.LogicManagerTest
-
6.3. Troubleshooting Testing
Problem: HelpWindowTest fails with a NullPointerException.
-
Reason: One of its dependencies,
HelpWindow.htmlinsrc/main/resources/docsis missing. -
Solution: Execute Gradle task
processResources.
7. Dev Ops
7.1. Build Automation
See UsingGradle.adoc to learn how to use Gradle for build automation.
7.2. Continuous Integration
We use Travis CI and AppVeyor to perform Continuous Integration on our projects. See UsingTravis.adoc and UsingAppVeyor.adoc for more details.
7.3. Coverage Reporting
We use Coveralls to track the code coverage of our projects. See UsingCoveralls.adoc for more details.
7.4. Documentation Previews
When a pull request has changes to asciidoc files, you can use Netlify to see a preview of how the HTML version of those asciidoc files will look like when the pull request is merged. See UsingNetlify.adoc for more details.
7.5. Making a Release
Here are the steps to create a new release:
-
Update the version number in
MainApp.java. -
Generate a JAR file using Gradle.
-
Tag the repo with the version number. e.g.
v0.1 -
Create a new release using GitHub and upload the JAR file you created.
7.6. Managing Dependencies
A project often depends on third-party libraries. For example, Schedule Planner depends on the Jackson library for XML parsing. Managing these dependencies can be automated using Gradle. For example, Gradle can download the dependencies automatically, which is better than the following alternatives:
a. Including those libraries in the repo (this bloats the repo size)
b. Requiring developers to download those libraries manually (this creates extra work for developers)
Appendix A: Product Scope
Target user profile:
-
have a need to manage their schedules for daily tasks
-
have a want to view and be reminded of important things
-
be able to set priority level on their schedule
-
prefer typing over mouse input
-
want a customizable schedule planner
Value proposition: Student Scheduler Planner manages schedules faster than a typical mouse/GUI driven app yet retains some GUI interface to allow users to have an easier view.
Appendix B: User Stories
Priorities: High (must have) - * * *, Medium (nice to have) - * *, Low (unlikely to have) - *
| Priority | As a … | I want to … | So that I can… |
|---|---|---|---|
|
student |
add task to to-do list |
keep track of tasks to do |
|
student |
view tasks in to-do list |
know when the deadlines of my tasks are |
|
student |
modify tasks in to-do list |
adjust or change my tasks according to my schedule |
|
student |
delete completed tasks in to-do list |
keep my to-do list clean and neat |
|
student |
view overdue tasks at the main page |
take note of the deadlines that I missed and try to make up |
|
student |
sort tasks by priority |
know what tasks I should do first |
|
student |
view tasks for today |
have a study/life plan for this day |
|
student |
view tasks for next 7 days |
have a relatively clear plan of this week |
|
student |
view tasks for the rest of the month |
view my schedule for the month |
|
student |
search my tasks by name |
find specific tasks easily |
|
student |
search my tasks by tags |
find specific tasks easily |
|
student |
view all commands |
to guide me so that I could use the application |
|
student |
view a calendar of all to-do tasks |
have an overview of all the tasks to do |
|
student |
view a history of all my commands in user-friendliness format |
view what changes I had made before |
|
student |
clear the screen |
have my screen interface cleaned of commands and result |
|
student |
sort tasks by tags |
tag my tasks |
|
student |
sort tasks by category |
categorise my tasks |
|
student |
create a "workshop" list |
record all the workshops that I have signed up |
|
student |
customise the theme of the student schedule planner |
personalise how my student schedule planner looks like |
|
student |
undo my command |
correct my mistake |
|
student |
redo my command |
correct my accidental "undo" |
|
student |
add and view subtasks under each task |
know specifically what tasks requires E.g CS2103T Project: Write User guide, Review Pull Requests, Peer Evaluation) |
|
student |
add my tasks that are non-school related |
have a schedule mixed with both school and non-school related tasks |
|
student |
list my tasks that are non-school related |
view my upcoming schedule of non-school related tasks |
|
student |
update my tasks that are non-school related |
update my upcoming schedule of non-school related tasks |
|
student |
delete my non-school related tasks if they are done |
update my upcoming schedule of non-school related tasks |
|
student |
search for my non-school related tasks |
to find a particular non-school related tasks |
{More to be added}
Appendix C: Use Cases
(For all use cases below, the System is the Student Schedule Planner and the Actor is the user, unless specified otherwise)
Use case: Add Task
MSS
-
User requests to add task into Student Schedule Planner.
-
Student Schedule Planner adds the exam into task list.
Use case ends.
Extensions
-
1a. The add Task command did not follow the correct format.
-
1a1. Student Schedule Planner shows an error message.
Use case ends.
-
Use case: List Task
MSS
-
User requests to view task list from Student Schedule Planner.
-
Student Schedule Planner display the task list.
Use case ends.
Extensions
-
1a. The list task command did not follow the correct format.
-
1a1. Student Schedule Planner shows an error message.
Use case ends.
-
-
2a1. The list is empty.
Use case ends.
Use case: Modify Task
MSS
-
User requests to list task list from Student Schedule Planner.
-
Student Schedule Planner display the task list.
-
User request to edit a specific task in the list.
-
Student Schedule Planner updates the task.
Use case ends.
Extensions
-
1a. The list task command did not follow the correct format.
-
1a1. Student Schedule Planner shows an error message.
Use case ends.
-
-
2a1. The list is empty.
Use case ends.
-
3a. The Modify task command did not follow the correct format.
-
3a1. Student Schedule Planner shows an error message.
Use case resume at step 3.
-
Use case: Delete Task
MSS
-
User requests to list task list from Student Schedule Planner.
-
Student Schedule Planner display the task list.
-
User request to delete a specific task in the list.
-
Student Schedule Planner delete the task.
Use case ends.
Extensions
-
1a. The list task command did not follow the correct format.
-
1a1. Student Schedule Planner shows an error message.
Use case ends.
-
-
2a1. The list is empty.
Use case ends.
-
3a. The Delete task command did not follow the correct format.
-
3a1. Student Schedule Planner shows an error message.
-
-
3b. The task to be deleted does not exist.
-
3b1. Student Schedule Planner shows an error message.
Use case ends.
-
Use case: Search Task
MSS
-
User requests to search a specific task by its name from Student Schedule Planner.
-
Student Schedule Planner filter the task by the given parameter.
-
Student Schedule Planner display the filtered task.
Use case ends.
Extensions
-
1a. The search task command did not follow the correct format.
-
1a1. Student Schedule Planner shows an error message.
Use case ends.
-
-
3a. The filtered task list is empty and thus display empty list.
Use case ends.
Use case: Filter Tasks according to Tags (Inclusive)
MSS
-
User requests to filter tasks by its tags from Student Schedule Planner.
-
Student Schedule Planner filters the tasks with tags entered by user.
-
Student Schedule Planner displays the filtered tasks.
Use case ends.
Extensions
-
1a. The filter task command did not follow the correct format.
-
1a1. Student Schedule Planner shows an error message.
Use case ends.
-
-
3a. The filtered task list is empty and thus displays an empty list.
Use case ends.
Use case: Filter Tasks according to Tags (Exclusive)
MSS
-
User requests to strictly filter tasks by its tags from Student Schedule Planner.
-
Student Schedule Planner strictly filters the tasks with tags entered by user.
-
Student Schedule Planner displays the strictly filtered tasks.
Use case ends.
Extensions
-
1a. The filterstrict task command did not follow the correct format.
-
1a1. Student Schedule Planner shows an error message.
Use case ends.
-
-
3a. The strictly filtered task list is empty and thus displays an empty list.
Use case ends.
Use case: List tasks due today
MSS
-
User requests to view tasks due on current date from the Student Schedule Planner.
-
Student Schedule Planner filters tasks by current date.
-
Student Schedule Planner displays list of tasks due on current date.
Use case ends.
Extensions
-
1a. The
listdaycommand did not follow the correct format.-
1a1. Student Schedule Planner shows an error message.
Use case ends.
-
-
3a. The filtered task list is empty and thus displays an empty list.
Use case ends.
Use case: List tasks due until this Sunday
MSS
-
User requests to view tasks due from the current date to Sunday from the Student Schedule Planner.
-
Student Schedule Planner filters tasks from current date to Sunday.
-
Student Schedule Planner displays list of tasks due from current date to Sunday.
Use case ends.
Extensions
-
1a. The
listweekcommand did not follow the correct format.-
1a1. Student Schedule Planner shows an error message.
Use case ends.
-
-
3a. The filtered task list is empty and thus displays an empty list.
Use case ends.
Use case: List tasks due until the end of the month
MSS
-
User requests to view tasks due from the current date until the end of month from the Student Schedule Planner.
-
Student Schedule Planner filters tasks from the range of current date until end of month
-
Student Schedule Planner display list of tasks due from current date until end of month.
Use case ends.
Extensions
-
1a. The
listmonthcommand did not follow the correct format.-
1a1. Student Schedule Planner shows an error message.
Use case ends.
-
-
3a. The filtered task list is empty and thus displays an empty list.
Use case ends.
Use case: Generate academic calendar weeks
MSS
-
User keys in a specific date to generate the academic calendar weeks.
-
Student Schedule Planner generates the academic calendar weeks.
-
Student Schedule Planner saves the academic calendar weeks.
-
Student Schedule Planner displays to user the command result.
-
User launches the Student Schedule Planner at any time after Steps 1 - 4.
-
Student Schedule Planner retrieves data saved.
-
Student Schedule Planner displays the updated application title based on the retrieved data.
Use case ends.
Extensions
-
1a. The specific date did not follow the correct format.
-
1a1. Student Schedule Planner shows an error message.
Use case ends.
-
-
3a. The data could not be saved.
-
3a1. Student Schedule Planner shows an error message.
Use case ends.
-
-
5a. The data could not be retrieved.
-
5a1. Student Schedule Planner shows an error message. Use case ends.
-
{More to be added}
Appendix D: Non Functional Requirements
-
The app should work on most Mainstream OS as long as it has Java
9or higher installed. -
Each command execution time should not take more than 3 seconds.
{More to be added}
Appendix E: Glossary
- MSS
-
Main Success Scenario (MSS) is the steps of a scenario to be followed to accomplish the objective goal.
- Mainstream OS
-
Windows, Linux, Unix, OS-X
- Private contact detail
-
A contact detail that is not meant to be shared with others
- NUS academic calendar
-
Refers to the academic calendar used by National University of Singapore. This product references only 17 weeks of the calendar (Week 1 to Examination Week).
Referenced from: http://www.nus.edu.sg/registrar/info/calendar/AY2018-2019.pdf
Appendix F: Instructions for Manual Testing
Given below are instructions to test the app manually.
| These instructions only provide a starting point for testers to work on; testers are expected to do more exploratory testing. |
F.1. Launch and Shutdown
-
Initial launch
-
Download the jar file and copy into an empty folder
-
Double-click the jar file
Expected: Shows the GUI with a set of sample contacts. The window size may not be optimum.
-
-
Saving window preferences
-
Resize the window to an optimum size. Move the window to a different location. Close the window.
-
Re-launch the app by double-clicking the jar file.
Expected: The most recent window size and location is retained.
-
F.2. Adding a task
-
Adding a task to the task list
-
Test case:
add n/cs2100 d/161118 p/3 v/home
Expected: A new task is added and reflected in the panel on the bottom right ofUI. Status bar is updated. -
Test case:
add n/cs2100 d/161118 p/4 v/home
Expected: No task is added. Error details shown in status message. Status bar remains the same. -
Test case:
add n/cs2100 d/999999 p/3 v/home
Expected: No task is added. Error details shown for date field.
-
F.3. Adding a recurring task
-
Adding a recurring task to the task list
-
Test case:
repeat r/5 i/1 n/go to school d/030118 v/NUS p/3
Expected: Five tasks with the same name, priority, venue, but with differing dates of 3, 4, 5, 6, 7 Nov 2018 are added to the list. The tasks are reflected in the task list panel. Status bar is updated. -
Test case:
repeat r/17 i/1 n/sleep d/010101 v/home p/1
Expected: No tasks are added. Error details shown in status message. Status bar remains the same. -
Test case:
repeat r/2 i/0 n/sleep d/010101 v/home p/1
Expected: No tasks are added. Error details shown in status message. Status bar remains the same.
-
F.4. Viewing overdue tasks
-
Viewing tasks due on dates before the current date
-
Test case: listoverdue
Expected: All tasks with dates before the current date are displayed in the task list panel. Status bar remains the same.
-
F.5. Editing a task
-
Editing a task from the task list
-
Test case:
edit 1 v/library
Expected: First task is edited. The new venue is library. -
Test case:
edit 1 t/
Expected: First task is edited. Any existing tags would be removed. -
Test case:
edit 1 d/999999
Expected: First task is not edited. Error details shown in status message. Status bar remains the same.
-
F.6. Archiving a task
-
Archiving a task from the task list
-
Test case:
archive 1
Expected: First task is archived if there exists at least 1 task in your schedule planner. -
Test case:
archive 0
Expected: No task is archived. Error details shown in the status message. Status bar may grow to the right depending on the deadline date and current system time.
-
F.7. Managing tags and categories
-
Adding category
-
Test case:
addcat c/Modules
Expected: No category is added, becauseModulesis a default category and it already exists in schedule planner. Error details shown in status message. -
Test case:
addcat c/School
Expected: If there is no category namedSchoolin your schedule planner at this time point, categorySchoolis now added. If there already exists a category namedSchoolin your schedule planner, then no category is added. Error details shown in status message.
-
-
Renaming a category
-
Test case:
editcat c/Modules c/WorkExpected: No category is renamed, becauseModulesis a default category that cannot be renamed. Error details shown in status message. -
Test case:
editcat c/School c/WorkExpected: If there is no category namedSchoolin your schedule planner at this time point, no category is renamed. Error details shown in status message. If there exists a category namedSchoolin your schedule planner and no category namedWorkin your schedule planner, categorySchoolis now renamed toWork. If there exists both a category namedSchooland a category namedWork, no category is renamed. Error details shown in status message.
-
-
Removing a category
-
Test case:
removecat c/ModulesExpected: No category is added, becauseModulesis a default category that cannot be removed. Error details shown in status message. -
Test case:
removecat c/SchoolExpcected: If there exists a category namedSchool, it is now removed from schedule planner. If this category does not exist, no category is removed. Error details shown in status message.
-
-
Clearing a category
-
Test case:
clearcat c/ModulesExpected: Tag list under categoryModulesis successfully cleared. Now categoryModulescontains no tags. -
Test case:
clearcat c/SchoolExpected: If categorySchoolexists in your schedule planner, tag list under categorySchoolis successfully cleared. Now categorySchoolcontains no tags. If this category does not exist, no category is cleared. Error details shown in status message.
-
-
Adding a tag to a category
-
Test case:
addtag c/Modules t/CS2101Expected: IfModulescategory currently does not contain tagCS2101, tagCS2101is successfully added to categoryModules. IfModulescategory already contains tagCS2101, no tag is added to this category. Error details shown in status message. -
Test case:
addtag c/School t/LectureExpected: If categorySchoolexists in your schedule planner, the result is similar to above. If categorySchooldoes not exist, no tag is added to any category. Error details shown in status message.
-
F.8. Deleting a task
-
Deleting a task while all tasks are listed
-
Prerequisites: List all tasks using the
listcommand. Multiple tasks in the list. -
Test case:
delete 1
Expected: First task is deleted from the list. Details of the deleted contact shown in the status message. Timestamp in the status bar is updated. -
Test case:
delete 0
Expected: No task is deleted. Error details shown in the status message. Status bar remains the same. -
Other incorrect delete commands to try:
delete,delete x(where x is larger than the list size)
Expected: Similar to previous.
-
F.9. Task Monitoring System
-
Generating academic calendar weeks data
-
Prerequisites: Only dates from 21st century in
DDMMYYformat is considered valid date. -
Test case:
firstday 161118 12
Expected: No academic calendar weeks data is generated. Error details shown in status message. Status bar remains the same. -
Test case:
firstday 999999
Expected: No academic calendar weeks data is generated. Error details shown in status message. Status bar remains the same. -
Test case:
firstday 161118
Expected: No academic calendar weeks data is generated. Error details shown in status message. Status bar remains the same. -
Test case:
firstday 130818
Expected: Academic calendar weeks data is generated and saved. Details shown in status message to inform user. After relaunching the application, the application title will be appended with current week’s description.
-
-
Viewing tasks due today/this week
-
Test case:
listday
Expected: All task(s) that match the current system date will be reflected in the panel on the bottom right ofUI. -
Test case:
listweek
Expected: All task(s) that match the date from the current system date until the closest Sunday will be reflected in the panel on the bottom right ofUI.
-
F.10. Filtering Tasks
-
Viewing tasks due this month
-
Test case:
listmonth
Expected: All task(s) that match the current system date until the end of the month will be reflected in the task list panel in theUI. -
Test case:
filter tutorialExpected: All tasks that contain the tagtutorialwill be reflected in the task list panel in theUI. -
Test case:
filter tutorial CS2100Expected: All tasks that contain EITHERtutorial,CS2100, OR BOTH tags, will be reflected in the task list panel in theUI. -
Test case:
filterstrict tutorialExpected: All tasks that contain the tagtutorialwill be reflected in the task list panel in theUI. Similar tofilter tutorial. -
Test case:
filterstrict tutorial GEH1034Expected: All tasks that contain BOTHtutorialandGEH1034tags will be reflected in the task list panel in theUI
-
F.11. Testing GUI
-
Displaying categories and tags in the sidebar
-
Test case:
clear
Expected: The default categories "Modules" and "Others" are be displayed in the sidebar. -
Test case:
addcat c/School
Expected: The new category "School" is displayed in the sidebar below "Modules" and "Others". -
Test case:
tags c/Modules
Expected: The Modules pane will be expanded to reveal nothing is listed underneath. -
Test case:
addtag c/Modules t/CS2100followed bytags c/Modules
Expected: The Modules pane will be expanded to reveal "CS2100" underneath.
-
-
Showing progress
-
Test case: add 5 tasks due on the current date and archive one of them. Expected: Both progress bars for today and this week are 20% filled.
-
Test case:
progresstoday
Expected: Status message displays that user has completed 20.00% of tasks for today. -
Test case:
progressweek
Expected: Status message displays that user has completed 20.00% of tasks for this week.
-